
Camshaft in cylinder head - r r with head removed
- Make
- Fiat
- Model
- Panda Factory Service Manual
- Year
- 2003–2012
- Section
- Timing system › Camshaft in cylinder head - r r with head removed
Camshaft in cylinder head - r r with head removed
Removing
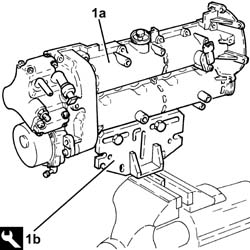
1. Position the upper cylinder head (1a) in the vice using the tool (1b).
| Name | Country | |
|---|---|---|
| 1b | Mount | 1.860.470.001 |
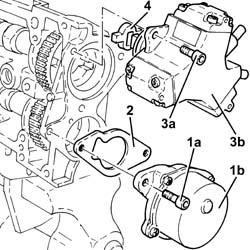
1. Undo bolts (1a) and remove vacuum unit (1b).
2. Remove the gasket.
3. Undo the bolts (3a) and remove the pressure pump (3b) complette with O-Ring.
4. Remove the coupling.
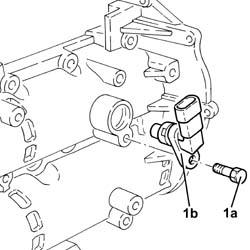
1. Undo the bolts (1a) and remove the cam angle sensor (1b).
Temporarily remove the tool fitted previously on the exhaust side camshaft.
| Name | Country | |
|---|---|---|
| Gauge | 1.870.896.900 |
Check that the end float of the camshaft is within the recommended values using a dial gauge.
| Measurement | Value | ||
|---|---|---|---|
| End float (mm) | 0.15 ÷ 0.34 |
If the end float of the camshaft is not within the recommended values, when reassembling the cylinder head, replace the worn components.
1. Remove the plug (1a) and fit the tool (1b) on the inlet side camshaft.
Fit the tool positioning it with the references in a horizontal direction and checking that it is correctly inserted in the housing in the camshaft.
| Name | Country | |
|---|---|---|
| 1b | Gauge | 1.870.896.900 |
2. Undo the camshaft sprocket fixing bolts.
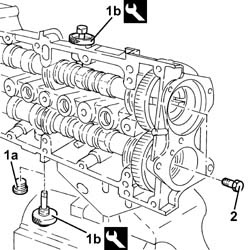
1. Remove the camshaft timing tools from the camshaft housing.
| Name | Country | |
|---|---|---|
| 1 | Gauge | 1.870.896.900 |
2. Release the camshafts (2a) as necessary and remove the camshaft gears (2b).
Remove the camshafts completely.
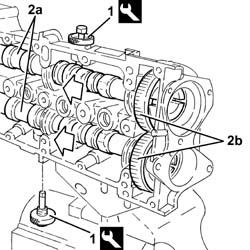
Refitting
Place the camshafts back in their housings.
Place the camshaft gears back in their housings and secure them without tightening the bolts.
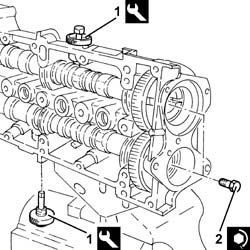
1. Fit the camshaft timing tools.
Fit the tool positioning it with the millings in a horizontal position and checking that it is correctly inserted in the housings in the camshafts.
| Name | Country | |
|---|---|---|
| 1 | Gauge | 1.870.896.900 |
2. Tighten the camshaft sprocket fixing bolts to the recommended torque.
| Fastening | Component | Ø | Value (daNm) | |
|---|---|---|---|---|
| 2 | Bolt | CYLINDER HEAD EXTENSION | M12 | (Camshaft side) 10.8 ÷ 13.2 |
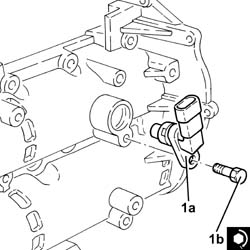
1. Place the cam angle sensor (1a) back in its housing and secure it tightening the bolt (1b) to the recommended torque.
| Fastening | Component | Ø | Value (daNm) | |
|---|---|---|---|---|
| 1b | Bolt | CAM ANGLE SENSOR | M6 | (Camshaft housing side) 0.6 ÷ 0.8 |
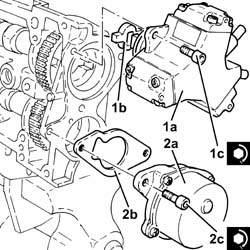
1. Place the pressure pump (1a), complete with coupling (1b) and new O-ring, back in its housing and fix it tightening the bolts (1c) to the recommended torque.
| Fastening | Component | Ø | Value (daNm) | |
|---|---|---|---|---|
| 1c | Bolt | PRESSURE PUMP | M7 | (Camshaft housing side) 1.4 ÷ 1.7 |
2. Place the vacuum unit (2a), complete with gasket (2b), back in its housing and secure it tightening the bolts (2c) to the recommended torque.
Follow the order shown in the diagram for each tightening sequence. Tighten to 2.0 daNm in two stages: an initial stage of 0.5 daNm following tightening to 1.8 - 2.2 daNm.
| Fastening | Component | Ø | Value (daNm) | |
|---|---|---|---|---|
| 2c | Bolt | BRAKE SERVO VACUUM PUMP | M8 | (Cylinder head side) 1.8 ÷ 2.2 |
Remove the support tool, complete with upper cylinder head from the vice and separate them.
Parts & tools for this job Staging For 2003 Fiat Panda
- PARTEngine gasket setSearch: Fiat Panda 2003 engine gasket set
- TOOLTorque wrenchSearch: 3/8 inch torque wrench
- TOOLFeeler gauge setSearch: feeler gauge set
Links open Amazon search results in a new tab. As an Amazon Associate I earn from qualifying purchases.