
Alternator - r+r
- Make
- Fiat
- Model
- Multipla Factory Service Manual
- Year
- 1998–2010
- Section
- Current generator › Alternator - r+r
Alternator - r+r
Removing
Position the vehicle on the lift and open the bonnet lid.
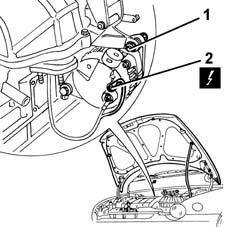
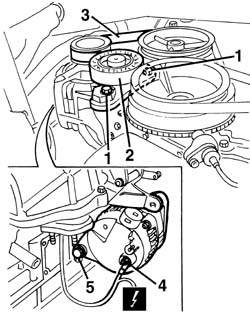
1. Working from the top of the engine compartment, undo and remove the upper bolt fixing the alternator.
2. Disconnect the upper electrical connection.
| Name | Connector | |
|---|---|---|
| 2 | Alternator | A10B |
Raise the car.
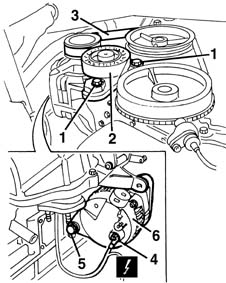
1. Undo the bolts fixing the belt tensioner.
2. Remove the belt tensioner.
3. Remove the belt from the alternator pulley.
4. Disconnect the lower electrical connection.
| Name | Connector | |
|---|---|---|
| 4 | Alternator | A10A |
5. Undo the bolt and remove it.
6. Recover the alternator.
Refitting
Check that the alternator is not damaged.
Position the alternator and fix it using the bolts.
| Fastening | Component | Ø | Value (daNm) | |
|---|---|---|---|---|
| Bolt | ALTERNATOR ASSEMBLY | M10 | 5 |
| Fastening | Component | Ø | Value (daNm) | |
|---|---|---|---|---|
| Bolt | ALTERNATOR ASSEMBLY | M12 | 7 |
Connect the electrical connections.
- 1092B50 alternator/air conditioner compressor drive belt - adjust tension
Removing
- 4450B04 right front wheel r r
- 1080B62 catalytic converter - r + r
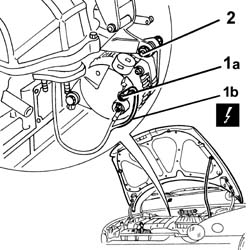
1. Undo the fixing nuts (1a) and disconnect the alternator wiring (1b).
| Name | Connector | |
|---|---|---|
| 1b | Alternator | A10 |
2. Undo and remove the upper alternator fixing bolt
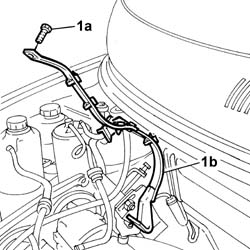
1. Tighten the fixing bolt (1a) and remove the bracket (1b) securing the rear Lambda sensor wiring.
Raise the car.
1. Undo the bolts fixing the belt tensioner.
2. Remove the belt tensioner.
3. Remove the belt from the alternator pulley.
4. Disconnect the lower electrical connection.
| Name | Connector | |
|---|---|---|
| 1b | Alternator | A10 |
5. Undo the lower alternator fixing nut and release it from its mounting.
Lower the vehicle.
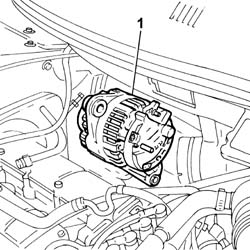
1. Working from the top of the engine compartment, remove the the alternator.
Refitting
Position the complete alternator in its housing and secure it by tightening the fixing bolts.
Position the rear Lambda sensor wiring mounting bracket and tighten the upper fixing bolt.
Check belt condition. In particular, check for tears, cracks, surface wear and dry or hard parts that could lead to loss of grip. Change the belt if one of these defects is noted.
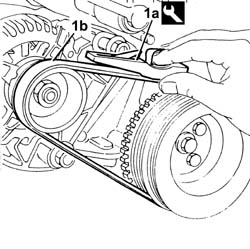
Fit the new alternator drive belt on the pullies.
1. Use tool (1a) and check that the tension of new belt (1a) is within the recommended values.
| Name | Country | |
|---|---|---|
| 1a | Torque wrench | 1.895.762.000 |
| Measurement | Value | ||
|---|---|---|---|
| Alternator drive belt tensioning (daNm) | 30 - 35 | ||
| New belt (-) | |||
Tighten the alternator bolts to torque.
| Fastening | Component | Ø | Value (daNm) | |
|---|---|---|---|---|
| Bolt | ALTERNATOR ASSEMBLY | M10 | 5 |
| Fastening | Component | Ø | Value (daNm) | |
|---|---|---|---|---|
| Bolt | ALTERNATOR ASSEMBLY | M12 | 8 |
Connect the alternator wiring and tighten the fixing nuts.
| Name | Connector | |
|---|---|---|
| Alternator | A10 |
| Fastening | Component | Ø | Value (daNm) | |
|---|---|---|---|---|
| Nut | ALTERNATOR ECU LEAD/S | M8 | (Cable B+) 2.4 |
- 1080B62 catalytic converter - r + r
- 4450B04 right front wheel r r
Parts & tools for this job Staging For 1998 Fiat Multipla
- TOOLBattery testerSearch: car battery tester
- TOOLDigital multimeterSearch: automotive digital multimeter
- TOOLBattery terminal cleanerSearch: battery terminal cleaner
Links open Amazon search results in a new tab. As an Amazon Associate I earn from qualifying purchases.