
Camshaft in cylinder head - r r with head removed
- Make
- Alfa Romeo
- Model
- GT Factory Service Manual
- Year
- 2003–2010
- Section
- Timing system › Camshaft in cylinder head - r r with head removed
CAMSHAFT IN CYLINDER HEAD - R R WITH HEAD REMOVED
Removing
Position the cylinder head on a special workbench.
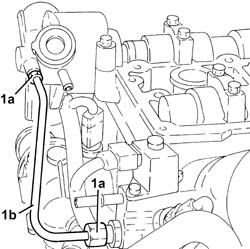
1. Undo the connectors (1a) and remove high pressure fuel pipe (1b).
The high pressure fuel pipe should be replaced each time it is refitted.
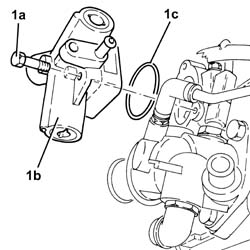
1. Undo the bolts (1a) and remove the high pressure fuel pump (1b) complete with O-ring (1c).
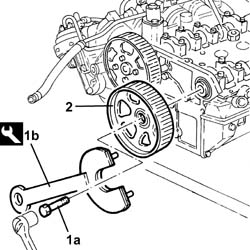
1. Undo the exhaust side driven timing pulley bolt (1a) using the tool (1b) for counter-torque.
| Description | Code | |
|---|---|---|
| 1b | Spanner for rotating timing pullies | 1.860.831.002 |
2. Remove the exhaust side timing driven pulley.
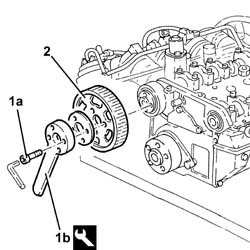
1. Undo the inlet side driven timing pulley bolt (1a) using the tool (1b) for counter-torque.
| Description | Code | |
|---|---|---|
| 1b | Counter-torque | 1.860.856.001 |
2. Remove the exhaust side timing driven pulley.
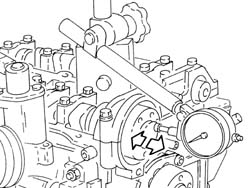
Check that the camshaft endfloat corresponds to the recommended values using a dial gauge on a magnetic base.
| Measurement | Value | ||
|---|---|---|---|
| Camshaft end float (mm) | 0.10 ÷ 0.23 |
If the endfloat for the camshafts does not correspond to the recommended values, replace the worn components when reassembling the cylinder head.
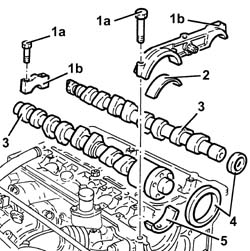
1. Undo the bolts (1a) and remove the camshaft caps (1b).
The front cap has silicon sealant, therefore a plastic hammer should be used for its removal.
2. Remove the inlet side camshaft front supper upper half-bearing.
3. Remove the camshafts.
4. Remove the camshaft front oil seals.
5. Remove the inlet side camshaft front support lower half-bearing.
Refitting
Clean any residues of sealant from the contact surfaces between the cylinder head and the front bearing cap.
Place the inlet side camshaft front support lower half-bearing in its housing.
Place the camshafts in their housings.
Place the inlet side camshaft front support upper half-bearing in its housing.
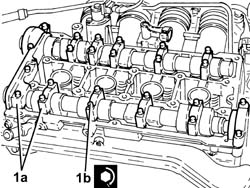
1. - Place the camshaft caps (1a) in their housings and secure them tightening the bolts (1b) to the recommended torque.
Apply silicon sealant between the front cap and the cylinder head.
| Fastening | Component | Ø | Value (daNm) | |
|---|---|---|---|---|
| 1b | Bolt | CAMSHAFT SUPPORTS | M7 | (Cylinder head side) 1.4 - 1.7 |
1. Fit the exhaust side camshaft front oil seal (1a) using the tool (1b).
| Description | Code | |
|---|---|---|
| 1b | Fitting tool | 1.821.228.000 |
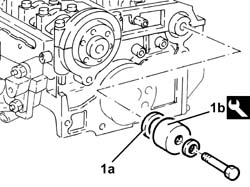
1. Fit the inlet side camshaft front oil seal (1a) using the tool (1b).
| Description | Code | |
|---|---|---|
| 1b | Fitting tool | 1.821.252.000 |
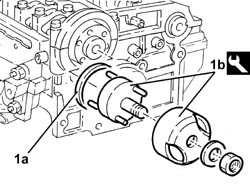
Refit the inlet side toothed driven pulley in its seat and secure with the bolts without tightening them.
Refit the exhaust side toothed driven pulley in its seat and secure with the bolt without tightening.
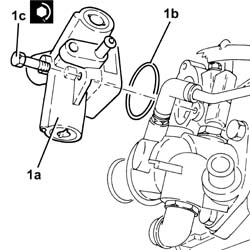
1. Position the high pressure fuel pump (1a), complete with O-ring (1b), in its housing and secure it tightening the bolts (1c) to the recommended torque.
| Fastening | Component | Ø | Value (daNm) | |
|---|---|---|---|---|
| 1c | Bolt | PRESSURE PUMP | M6 | (Cylinder head side) 0.8 - 1.0 |
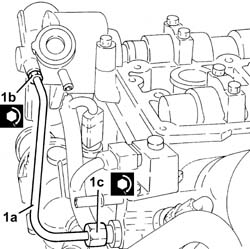
1. Position a new high pressure fuel pipe (1a) in its housing and secure it tightening connectors (1b) and (1c) to the recommended torque.
| Fastening | Component | Ø | Value (daNm) | |
|---|---|---|---|---|
| 1b | Connector | HIGH PRESSURE FUEL PIPE | M10 | (High pressure pump side) 1.2 - 1.6 |
| Fastening | Component | Ø | Value (daNm) | |
|---|---|---|---|---|
| 1c | Connector | HIGH PRESSURE FUEL PIPE | M12 | (Fuel manifold pipe side) 2.0 - 2.4 |
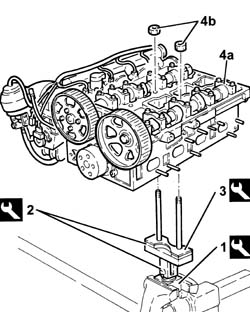
Removing
1. Place the tool in the vice.
| Description | Code | |
|---|---|---|
| 1 | Support | 1.820.012.000 |
2. Fit the tool.
| Description | Code | |
|---|---|---|
| 2 | Support | 1.820.258.000 |
3. Fit the tool.
| Description | Code | |
|---|---|---|
| 3 | Spacer | 1.820.267.000 |
4. Position the cylinder head (4a) on the support tools and fasten it using the nuts (4b).
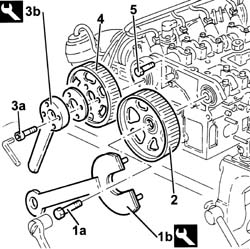
1. Undo the exhaust side camshaft pulley bolt (1a) using the tools (1b) for counter-torque.
| Description | Code | |
|---|---|---|
| 1b | Counter-torque | 1.822.146.000 |
| Description | Code | |
|---|---|---|
| 1b | Counter-torque | 1.822.156.000 |
2. Remove the exhaust side camshaft drive pulley.
3. Undo the inlet side camshaft drive pulley bolts (3a) using the tool (3b) for counter-torque.
| Description | Code | |
|---|---|---|
| 3b | Counter-torque | 1.822.155.000 |
4. Remove the inlet side camshaft drive pulley.
5. Undo the bolt fixing the cam angle sensor to the camshaft front cap.
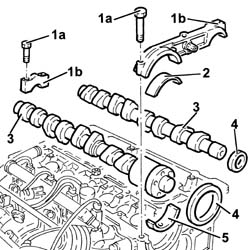
1. Undo the bolts (1a) and remove the camshaft caps (1b).
Place them in order for refitting.
2. Remove the inlet side camshaft front supper upper half-bearing.
3. Remove the camshafts.
4. Remove the camshaft front oil seals.
5. Remove the inlet side camshaft front support lower half-bearing.
Refitting
Fit the inlet side camshaft front support lower half-bearing.
Fit the camshafts.
Fit the inlet side camshaft front support upper half-bearing.
Fit the camshaft caps and secure them tightening the bolts to the recommended torque.
| Fastening | Component | Ø | Value (daNm) |
|---|
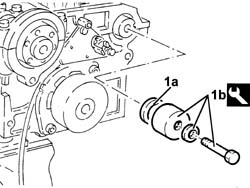
1. Fit the exhaust side camshaft front oil seal (1a) using the tool (1b).
| Description | Code | |
|---|---|---|
| 1b | Fitting tool | 1.821.228.000 |
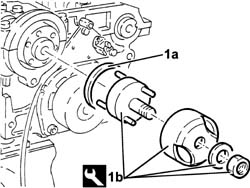
1. Fit the inlet side camshaft front oil seal (1a) using the tool (1b).
| Description | Code | |
|---|---|---|
| 1b | Fitting tool | 1.821.252.000 |
5. Tighten the bolt fixing the cam angle sensor to the camshaft front cap.
Remove the cylinder head from the support tools.
Remove the cylinder head support tools from the vice and put them down.
Removing
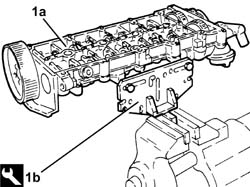
1. Position the upper cylinder head (1a) in the vice using the tool (1b).
| Name | Country | |
|---|---|---|
| 1b | Mount | 1.860.470.001 |
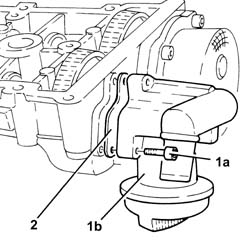
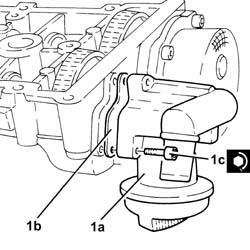
1. Undo the bolts (1a) and remove the engine oil filler (1b).
2. Remove the gasket.
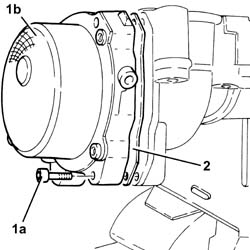
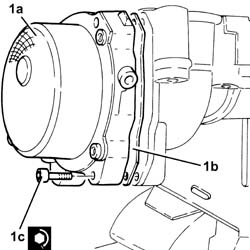
1. Undo bolts (1a) and remove vacuum unit (1b).
2. Remove the gasket.
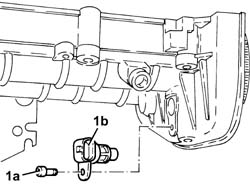
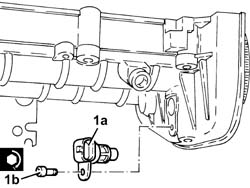
1. Undo the bolts (1a) and remove the cam angle sensor (1b).
Check that the end float of the camshaft is within the recommended values using a dial gauge.
If the end float of the camshaft is not within the recommended values, when reassembling the cylinder head, replace the worn components.
1. Remove the plugs (1a) and fit the camshaft timing tools (1b) in the upper cylinder head.
Check that the tools are correctly inserted in the housings in the camshafts.
| Name | Country | |
|---|---|---|
| 1b | Gauge | 1.870.896.900 |
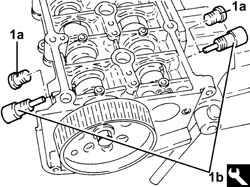
1. Undo the camshaft sprocket fixing bolts.
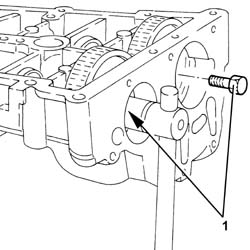
1. Undo the bolt (1a) and remove the exhaust side camshaft toothed drive pulley (1b).
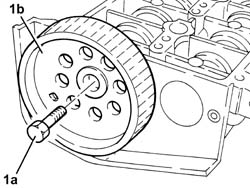
Remove the camshaft timing tools from the camshaft housing.
| Name | Country | |
|---|---|---|
| Gauge | 1.870.896.900 |
1. Release the camshafts (1a) as necessary and remove the camshaft sprockets (1b).
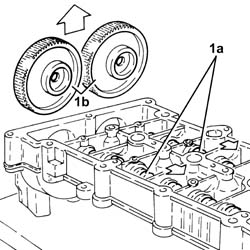
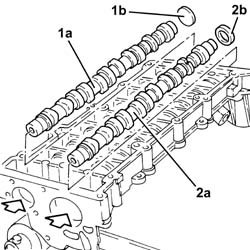
1. Using a suitable drift, extract the inlet side camshaft (1a) and the plug (1b).
2. Using a suitable drift, extract the exhaust side camshaft (2a) and the oil seal (2b).
Remove the exhaust side camshaft oil seal.
Refitting
Place the camshafts back in their housings.
Place the camshaft gears back in their housings and secure them without tightening the bolts.
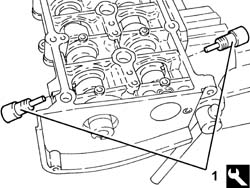
1. Fit the camshaft timing tools.
| Name | Country | |
|---|---|---|
| 1 | Gauge | 1.870.896.900 |
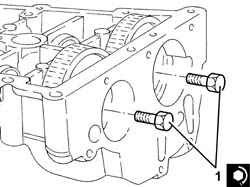
1. Tighten the camshaft sprocket fixing bolts to the recommended torque.
| Fastening | Component | Ø | Value (daNm) |
|---|
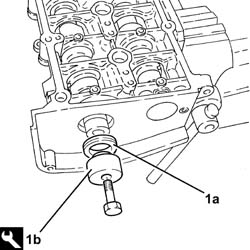
1. Fit the front camshaft oil seal, exhaust side (1a) using the tool (1b).
| Name | Country | |
|---|---|---|
| 1b | Fitting tool | 1.870.896.800 |
Fit the inlet side camshaft plug.
Fit the exhaust side timing drive pulley and fix it with the bolt without tightening it.
1. Place the cam angle sensor (1a) back in its housing and secure it tightening the bolt (1b) to the recommended torque.
| Fastening | Component | Ø | Value (daNm) | |
|---|---|---|---|---|
| 1b |
1. Place the vacuum unit (1a), complete with gasket (1b), back in its housing and secure it tightening the bolts (1c) to the recommended torque.
| Fastening | Component | Ø | Value (daNm) | |
|---|---|---|---|---|
| 1c |
1. Place the engine oil filler (1a), complete with gasket (1b), back in its housing and secure it tightening the bolts (1c) to the recommended torque.
| Fastening | Component | Ø | Value (daNm) |
|---|
Remove the support tool, complete with upper cylinder head from the vice and separate them.
Parts & tools for this job Staging For 2003 Alfa Romeo GT
- PARTEngine gasket setSearch: Alfa Romeo GT 2003 engine gasket set
- TOOLTorque wrenchSearch: 3/8 inch torque wrench
- TOOLFeeler gauge setSearch: feeler gauge set
Links open Amazon search results in a new tab. As an Amazon Associate I earn from qualifying purchases.