
Catalytic converter - r + r
- Make
- Alfa Romeo
- Model
- GT Factory Service Manual
- Year
- 2003–2010
- Section
- Exhaust emission control system › Catalytic converter - r + r
CATALYTIC CONVERTER - R + R
Removing
Position the vehicle on a lift.
Make sure that the ignition key is in the OFF position, then disconnect the negative battery terminal.
| Description | Connector | |
|---|---|---|
| Battery | See A1B BATTERY ( BATTERY NEGATIVE ) |
Drain the air conditioning refrigerant circuit
Op. 0010T84 COOLANT FOR AIR CONDITIONING SYSTEM DEHYDRATE AND RECHARGE.
Proceed with the removal
Op. 4450B04 RIGHT FRONT WHEEL R R.
Proceed with the removal
Op. 7055B54 UNDER-ENGINE GUARD - R R.
Proceed with the removal
Op. 5040A20 AIR CONDITIONER COMPRESSOR - R+R - INCLUDES FLUID LEVEL CHECK AND TOP UP IF NECESSARY.
Proceed with the removal
Op. 5040A26 COMPRESSOR MOUNT - R R.
Proceed with the removal
Op. 1016A40 IGNITION COIL COVER ON CYLINDER HEAD- R+R.
Proceed with the removal
Op. 1076A48 CATALYTIC CONVERTER HEAT SHIELD - R R.
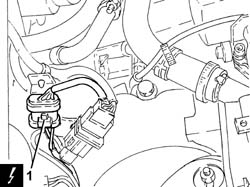
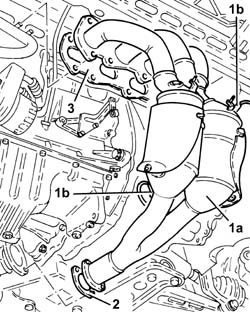
1. Disconnect the electrical connection for the right rear Lambda sensor at the catalytic converter and release it from the mounting bracket.
| Description | Connector | |
|---|---|---|
| 1 | Lambda sensor on catalyzer - 2 | See K18 LAMBDA SENSOR ON CATALYZER 2 ( CONNECTORS ) |
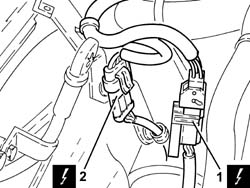
1. Disconnect the electrical connection for the left Lambda sensor and release it from the mounting bracket.
| Description | Connector | |
|---|---|---|
| 1 | Lambda sensor on pre-catalyzer | See K15 LAMBDA SENSOR ON PRE-CATALYZER |
2. Disconnect the electrical connection for the left rear Lambda sensor at the catalytic converter and release it from the mounting bracket.
| Description | Connector | |
|---|---|---|
| 2 | Lambda sensor on catalyzer | See K17 LAMBDA SENSOR ON CATALYZER ( CONNECTORS ) |
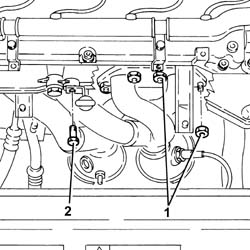
1. Undo the nuts fixing the catalytic converter to the cylinder head.
2. Undo the bolt fixing the guide pipe for the engine oil dipstick to the water pump rigid inlet pipe.
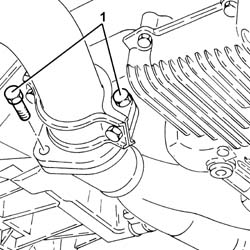
1. Undo the bolts fixing the catalytic converter to the front section of the exhaust pipe.
1. Remove the catalytic converter (1a) complete with Lambda sensor (1b).
2. Remove the gasket between the catalytic converter and the front section of the exhaust pipe.
3. Remove the gasket between the catalytic converter and the cylinder head.
Refitting
Refit the catalytic converter complete with gaskets in position.
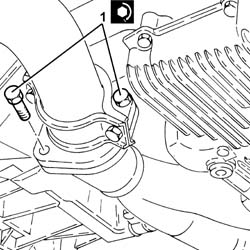
1. Tighten the bolts fixing the catalytic converter to the front section of the exhaust pipe to the recommended torque.
| Fastening | Component | Ø | Value (daNm) | |
|---|---|---|---|---|
| 1 | Bolt | CATALYTIC CONVERTER (ONE) | M8 | (Exhaust pipe front section side) 2.3 - 2.8 |
1. Tighten the bolt fixing the guide pipe for the engine oil dipstick to the water pump rigid inlet pipe.
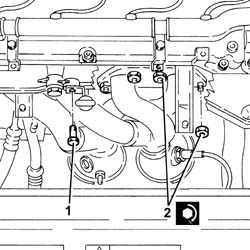
2. Tighten the nuts fixing the catalytic converter to the cylinder head to the recommended torque.
| Fastening | Component | Ø | Value (daNm) | |
|---|---|---|---|---|
| 2 | Nut | CATALYTIC CONVERTER (ONE) | M8 | (Cylinder head side) 2.3 - 2.8 |
Connect the electrical connection for the left rear Lambda sensor to the catalytic converter and fasten it to the mounting bracket.
Connect the electrical connection for the left Lambda sensor and secure it to the mounting bracket.
Connect the electrical connection for the right rear Lambda sensor to the catalytic converter and fasten it to the mounting bracket.
Proceed with the refitting
Op. 1076A48 CATALYTIC CONVERTER HEAT SHIELD - R R.
Proceed with the refitting
Op. 1016A40 IGNITION COIL COVER ON CYLINDER HEAD- R+R.
Proceed with the refitting
Op. 5040A26 COMPRESSOR MOUNT - R R.
Proceed with the refitting
Op. 5040A20 AIR CONDITIONER COMPRESSOR - R+R - INCLUDES FLUID LEVEL CHECK AND TOP UP IF NECESSARY.
Proceed with the refitting
Op. 7055B54 UNDER-ENGINE GUARD - R R.
Proceed with the refitting
Op. 4450B04 RIGHT FRONT WHEEL R R.
Refill the air conditioning refrigerant circuit
Op. 0010T84 COOLANT FOR AIR CONDITIONING SYSTEM DEHYDRATE AND RECHARGE.
Connect the negative battery terminal (-).
Remove the vehicle from the lift.
Removing
Position the vehicle on a lift.
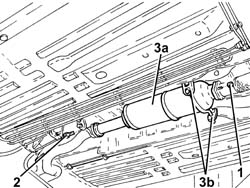
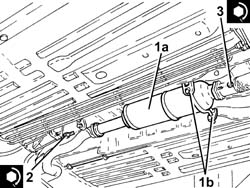
1. Undo the nuts fixing the catalytic converter to the front section of the exhaust pipe.
2. Undo the bolts fixing the catalytic converter to the exhaust pipe rigid pipe.
3. Remove the catalytic converter (3a) after having released it from the flexible mountings (3b).
Remove the seals.
Refitting
1. Place the catalytic converter (1a) back in its housing complete with gaskets and secure it to the flexible mountings (1b).
2. Tighten the bolts fixing the catalytic converter to the exhaust pipe rigid pipe to the recommended torque.
| Fastening | Component | Ø | Value (daNm) | |
|---|---|---|---|---|
| 2 | Bolt | CATALYTIC CONVERTER (ONE) | M8 | (Rigid pipe side) 2.3 - 2.8 |
3. Tighten the nuts fixing the catalytic converter to the front section of the exhaust pipe to the recommended torque.
| Fastening | Component | Ø | Value (daNm) | |
|---|---|---|---|---|
| 3 | Nut | CATALYTIC CONVERTER (ONE) | M8 | (Exhaust pipe front section side) 2.3 - 2.8 |
Remove the vehicle from the lift.
Removing
Position the vehicle on a lift.
Make sure that the ignition key is in the OFF position, then disconnect the negative battery terminal.
| Description | Connector | |
|---|---|---|
| Battery | Vedere A1B BATTERIA ( CABLAGGI ) |
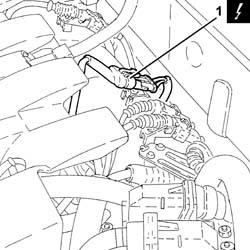
1. Disconnect the electrical connection for the Lambda sensor.
| Description | Connector | |
|---|---|---|
| 1 | Lambda sensor downstream of the post-converter | Vedere K17 SONDA LAMBDA A VALLE DEL POST-CATALIZZATORE ( MOTORE ) |
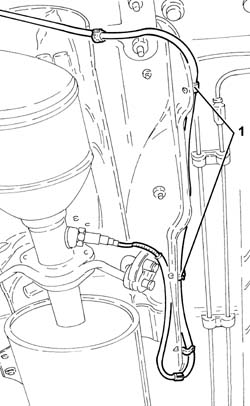
1. Release the electrical wiring for the Lambda sensor from the fastenings.
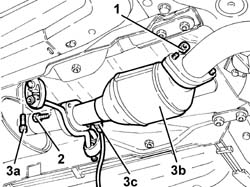
1. Undo the nuts fixing the catalytic converter to the catalytic preconverter.
2. Undo the bolts fixing the catalytic converter to the intermediate exhaust silencer.
3. Undo the bolts (3a) for the flexible supports and remove the catalytic converter (3b) complete with Lambda sensor (3c) and gaskets.
Refitting
1. Place the catalytic converter (1a) complete with Lambda sensor (1b) and gaskets in position.
2. Tighten the flexible support bolts.
3. Tighten the bolts fixing the catalytic converter to the intermediate exhaust silencer to the recommended torque.
| Fastening | Component | Ø | Value (daNm) | |
|---|---|---|---|---|
| 3 | Bolt | CATALYTIC CONVERTER (ONE) | M8 | (Intermediate silencer side) 2.7 - 3.3 |
4. Tighten the nuts fixing the catalytic converter to the catalytic preconverter to the recommended torque.
| Fastening | Component | Ø | Value (daNm) | |
|---|---|---|---|---|
| 4 | Nut | CATALYTIC CONVERTER (ONE) | M8 | (Catalytic preconverter side) 2.7 - 3.3 |
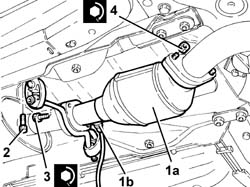
Secure the electrical wiring for the Lambda sensor to the fastenings.
Connect the electrical connection for the Lambda sensor.
Connect the negative battery terminal (-).
Remove the vehicle from the lift.
Parts & tools for this job Staging For 2003 Alfa Romeo GT
- PARTExhaust gasketSearch: Alfa Romeo GT 2003 exhaust gasket
- TOOLPenetrating oilSearch: penetrating oil
- TOOLOBD2 scannerSearch: OBD2 scanner
Links open Amazon search results in a new tab. As an Amazon Associate I earn from qualifying purchases.