
Camshafts in camshaft housing - r.r - includes camshaft housing replacement, if necessary
- Make
- Alfa Romeo
- Model
- Brera and Spider Factory Service Manual
- Year
- 2005–2010
- Section
- Timing system › Camshafts in camshaft housing - r.r - includes camshaft housing replacement, if necessary
CAMSHAFTS IN CAMSHAFT HOUSING - R.R - INCLUDES CAMSHAFT HOUSING REPLACEMENT, IF NECESSARY
Removing
- Make sure that the ignition key is in the OFF position, then disconnect the battery terminal (-).
| Description | Connector | |
|---|---|---|
| Battery | See A001 BATTERY |
Op. 1048A28 VACUUM AIR CIRCUIT RESONATOR PIPE - R+R
- Using a suitable syringe, draw off the power assisted steering fluid from the reservoir.
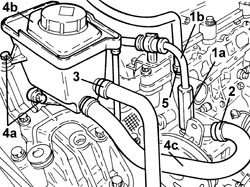
1. Undo the connector (1a) and disconnect the supply pipe from the pump to the power assisted steering box (1b), power assisted steering pump side.
2. Loosen the band and disconnect the supply pipe from the fluid reservoir to the power assisted steering pump, power assisted steering pump side.
3. Loosen the band and disconnect the return pipe from the heat exchanger to the power assisted steering fluid reservoir, reservoir side.
4. Undo the bolts (4a) and remove the power assisted steering fluid reservoir (4b) complete with pipe (4c).
5. Loosen the band and disconnect the coolant return pipe, cylinder head side.
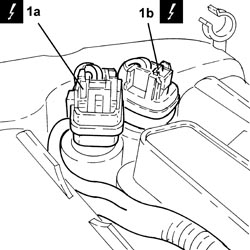
1. Disconnect the electrical connections (1a) and (1b) from the phase transformer electromagnets.
| Description | Connector | |
|---|---|---|
| 1a | Exhaust side phase transformer solenoid valve | See N093 PHASE SHIFTER SOLENOID VALVE ON EXHAUST SIDE |
| Description | Connector | |
|---|---|---|
| 1b | Inlet side phase transformer solenoid valve | See N092 PHASE SHIFTER SOLENOID VALVE ON INTAKE SIDE |
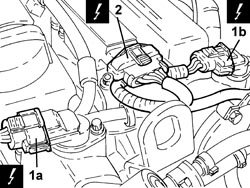
1. Disconnect the electrical connections (1a) and (1b) from the cam angle sensors.
| Description | Connector | |
|---|---|---|
| 1a | Exhaust side timing sensor | See K107 EXHAUST SIDE TIMING SENSOR |
| Description | Connector | |
|---|---|---|
| 1b | Inlet side timing sensor | See K106 INTAKE SIDE TIMING SENSOR |
2. Disconnect the electrical connections from the electronic power module.
| Description | Connector | |
|---|---|---|
| 2 | Ignition coil | See A030 IGNITION COIL |
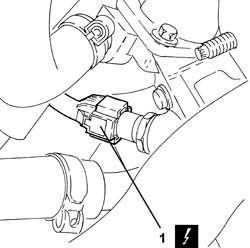
1. Disconnect the electrical connection from the engine coolant temperature sensor.
| Description | Connector | |
|---|---|---|
| 1 | Engine coolant temperature sensor/sender unit | See K036 ENGINE COOLANT TEMPERATURE SENSOR/SENDER UNIT |
- Release the engine electrical wiring from the securing bands and move it aside.
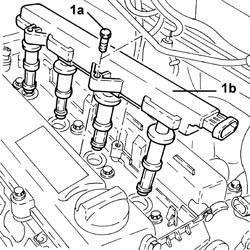
1. Undo the bolts (1a) and remove the electronic power module (1b).
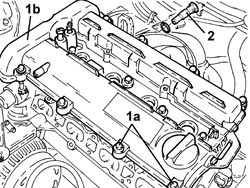
1. Undo the bolts (1a) and remove the tappet cover (1b) complete with gaskets.
2. Unscrew the timing system hydraulic tensioner and remove it.
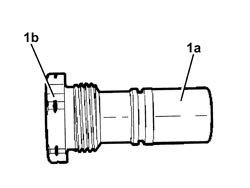
1. If no mark (1b) is present on the fixed timing chain hydraulic tensioner (1a), replace the tensioner with a new unit including a new mobile chain tensioner pad.
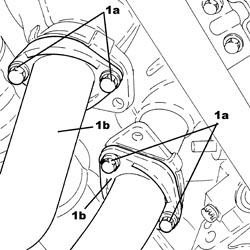
1. Undo the bolts (1a) and disconnect the intermediate exhaust pipe (1b), exhaust manifold side with the catalytic converter.
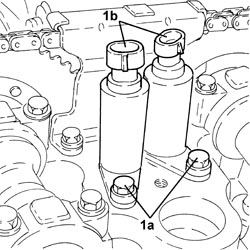
1. Undo the bolts (1a) and remove the phase transformer electromagnets (1b).
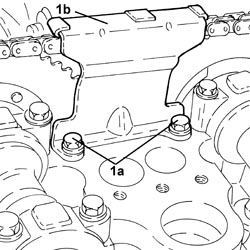
1. Undo the bolts (1a) and remove the upper timing chain tensioner pad (1b).
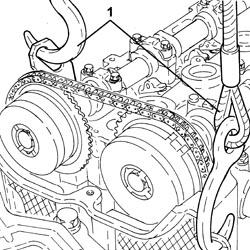
1. Support the engine using a hydraulic hoist fitted with suitable chains attached to the brackets on the actual engine.
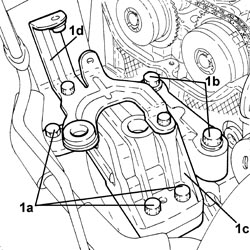
1. Undo the bolts (1a), (1b) and remove the flexible mounting for the power unit timing side front support (1c) complete with power assisted steering fluid reservoir mounting bracket (1d).
- Raise the engine as necessary using the hydraulic hoist.
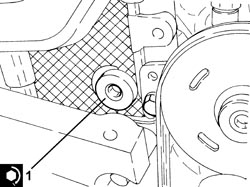
1. Undo the access cap to the fixed belt tensioner pad upper fixing bolt.
- Undo the upper fixed belt tensioner fixed pad fixing bolt.
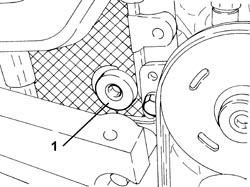
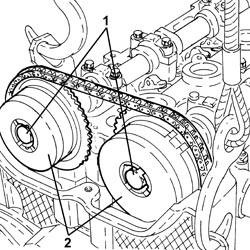
1. Undo the camshaft phase transformer fixing bolts.
Turn the hexagonal bolts on the camshafts to provide countertorque.
2. Remove the camshaft phase transformers.
Secure the timing chain appropriately.
Op. 1056F76 HIGH PRESSURE PIPE FROM PRESSURE PUMP TO SINGLE FUEL MANIFOLD PIPE R R
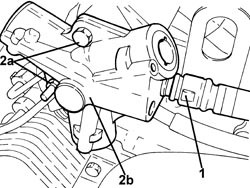
1. Disconnect the rapid connector for the fuel supply pipe, pressure pump side.
2. Undo the bolts (2a) and remove the pressure pump (2b).
1. Undo the bolts (1a) and remove the inlet side camshaft caps (1b).
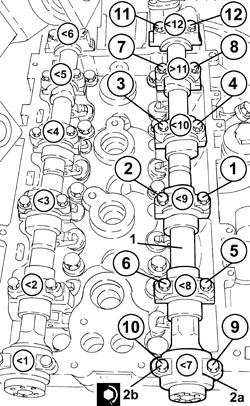
Gradually loosen the camshaft cap bolts by half/one turn in the sequence shown in the figure. The camshaft should come away evenly from its seats.
2. Remove the intake side camshaft.
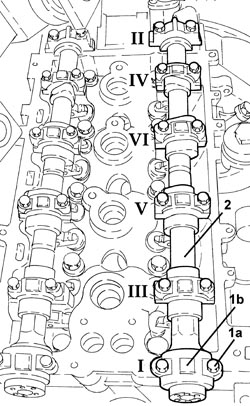
- Repeat these operations for the exhaust side camshaft.
Refitting
If the camshafts are replaced, also replace the rockers.
1. Replace the intake side camshaft in its housing.
Moisten the sliding surfaces with MoS2 lubricant paste (grey)
2. Place the inlet side camshaft caps (2a) in their housings and secure them tightening the bolts (2b) to the recommended torque.
Position the camshaft caps in accordance with the stamps shown in the diagram.
| Component | Fastening | dia | Value (daNm) | Validity |
|---|---|---|---|---|
| Camshaft rear caps | Bolt | M6 | (cylinder head side) 0.7 - 0.9 | 1.9 JTS 2.2 JTS |
| Component | Fastening | dia | Value (daNm) | Validity |
|---|---|---|---|---|
| Camshaft front/intermediate caps | Bolt | M8 | (cylinder head side) 1.8 - 2.2 | 1.9 JTS 2.2 JTS |
- Repeat these operations for the exhaust side camshaft.
- Tighten the upper bolt fixing the fixed belt tensioner pad to the recommended torque.
| Component | Fastening | dia | Value (daNm) | Validity |
|---|---|---|---|---|
| Timing fixed chain tensioner pad | Upper bolt | M6 | (cylinder head side) 0.8 | 1.9 JTS 2.2 JTS |
1. Tighten the access cap to the belt tensioner pad upper fixing bolt to the recommended torque.
| Component | Fastening | dia | Value (daNm) | Validity |
|---|---|---|---|---|
| Cap for timing fixed chain tensioner pad upper bolt | M22 | 6.5 | 1.9 JTS 2.2 JTS |
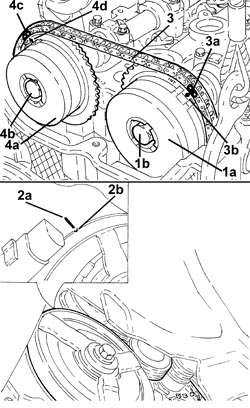
1. Place the inlet side camshaft phase transformer (1a) in its housing and secure it using a new bolt (1b) without tightening it.
2. If necessary, rotate the crankshaft until cylinder no. 4 is at T.D.C. in the explosion stroke; in this condition the reference (2a) on the inner part of the crankshaft pulley should be in line with the reference (2b) on the timing chain cover.
Rotate the crankshaft slowly and evenly (in the direction of rotation).
Ensure the timing chain is not stuck.
3. Fit the timing chain on the inlet side camshaft phase transformer.
The light blue mesh (3a) should be in line with the reference (3b) on the inlet side camshaft phase transformer.
4. Place the exhaust side camshaft phase transformer (4a) in its housing and secure it using a new bolt (4b) without tightening it.
Rotate the exhaust side camshaft using the hexagon until the pink mesh (4c) is in line with the reference (4d) on the exhaust side camshaft phase transformer.
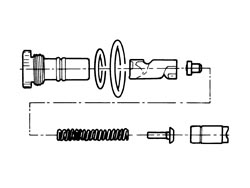
- The following drawing shows the fixed timing chain hydraulic tensioner disassembled.
Replace the seals.
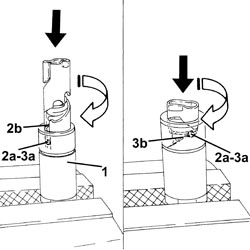
- Before it is possible to refit the timing fixed hydraulic tensioner it must be pre-loaded as described below.
1. Place the piston in a vice with protective jaws, holding by the square end.
2. Insert the piston into the tensioner case by pressing and turning as shown in the figure until the pin (2a) fits into the groove (2b).
3. Press and simultaneously turn the piston until the pin (3a) fits into the groove (3b).
- Insert the assembled piston into the tensioner body.
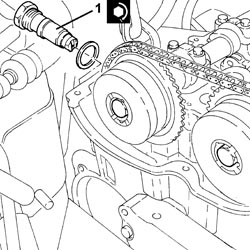
1. Refit the timing chain hydraulic tensioner into its seat and tighten to the specified torque.
| Component | Fastening | dia | Value (daNm) | Validity |
|---|---|---|---|---|
| Timing fixed hydraulic tensioner | M27 | 7.5 | 1.9 JTS 2.2 JTS |
1. Move the timing chain hydraulic tensioner to operating position by exercising overall pressure by hand on the chain in the area shown in the figure. This puts the chain under tension, which in turn acts on the mobile pad to release the mobile tensioner piston.
When the piston is activated the spring will make a noise.
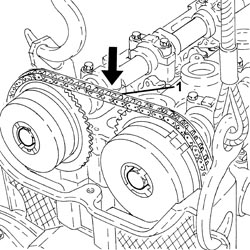
If the chain remains slack, the tensioner is not in the operating position.
- Rotate the crankshaft through 720°, then place cylinder no. 4 at T.D.C. during the explosion stroke; in this condition the reference on the inner part of the crankshaft pulley should be aligned with the reference on the timing chain cover.
When the crankshaft is rotated the tensioner piston should follow the chain during the rotation stage.
- Check the timing making sure that the timing references correspond.
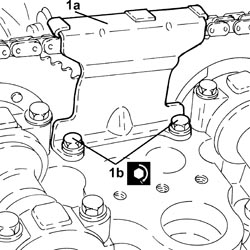
1. Place the upper timing chain upper pad (1a) in its housing and fasten it tightening the bolts (1b) to the recommended torque.
| Component | Fastening | dia | Value (daNm) | Validity |
|---|---|---|---|---|
| Timing upper chain tensioner pad | Bolt | M6 | (cylinder head side) 1.0 | 1.9 JTS 2.2 JTS |
1. Tighten the bolts fixing the camshaft phase transformers to the recommended torque tightening the exhaust side phase transformer bolt first.
Turn the hexagonal bolts on the camshafts to provide countertorque.
| Component | Fastening | dia | Value (daNm) | Validity |
|---|---|---|---|---|
| Camshaft phase transformers | Bolt | M11 | (camshaft side) 9.0 - 11.0 | 1.9 JTS 2.2 JTS |
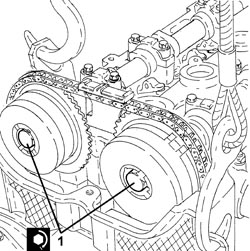
1. Position the pressure pump (1a) in its housing and secure it tightening the bolts (1b) to the recommended torque.
| Component | Fastening | dia | Value (daNm) | Validity |
|---|---|---|---|---|
| Pressure pump | Bolt | M6 | 1.0 | 1.9 JTS 2.2 JTS |
2. Connect the rapid connector for the fuel supply pipe, pressure pump side.
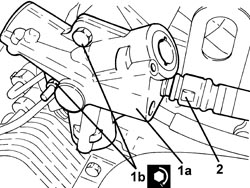
Op. 1056F76 HIGH PRESSURE PIPE FROM PRESSURE PUMP TO SINGLE FUEL MANIFOLD PIPE R R
1. Place the timing side power unit front support flexible mounting (1a) in its housing complete with power assisted steering fluid reservoir mounting bracket (1b) and secure it tightening the bolts (1c) and (1d) to the recommended torque.
| Component | Fastening | dia | Value (daNm) | Validity |
|---|---|---|---|---|
| Timing side power unit rigid support flexible mounting | Bolt (to be replaced) | M12 | (rigid support side) 6.3 - 7.7 + 90° |
| Component | Fastening | dia | Value (daNm) | Validity |
|---|---|---|---|---|
| Timing side power unit rigid support flexible mounting | Bolt (to be replaced) | M12 | (bodyshell side) 6.3 - 7.7 + 90° |
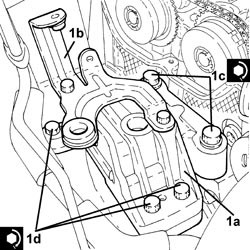
- Remove the hydraulic hoist fitted with suitable chains for supporting the engine.
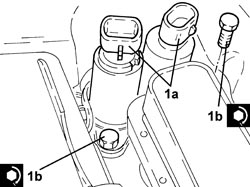
1. Place the phase transformer electromagnets (1a) in their housings and secure them tightening the bolts (1b) to the recommended torque.
The white phase transformer electromagnet is the inlet side one and the black phase transformer electromagnet is the exhaust side one.
| Component | Fastening | dia | Value (daNm) | Validity |
|---|---|---|---|---|
| Phase transformer solenoids | Bolt | M6 | (cylinder head side) 1.0 | 1.9 JTS 2.2 JTS 3.2 JTS |
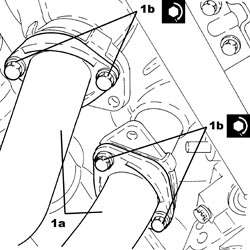
1. Connect the intermediate exhaust pipe (1b), exhaust manifold side with the catalytic converter and tighten the bolts (1b) to the recommended torque.
| Component | Fastening | dia | Value (daNm) | Validity |
|---|---|---|---|---|
| Intermediate exhaust pipe with flexible section | Bolt | M8 | (exhaust manifold side with catalytic converter) 2.2 - 2.6 | 1.9 JTS 2.2 JTS |
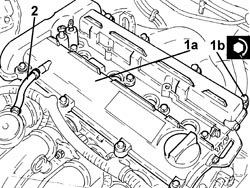
1. Place the tappet cover (1a) complete with gaskets in its housing and secure it tightening the bolts (1b) to the recommended torque.
| Component | Fastening | dia | Value (daNm) | Validity |
|---|---|---|---|---|
| Tappet cover | Bolt | M6 | (cylinder head side) 0.7 - 0.9 | 1.9 JTS 2.2 JTS |
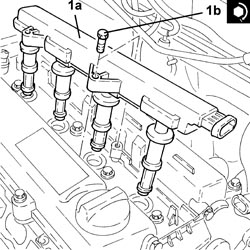
1. Place the electronic power module (1a) in its housing and secure it tightening the bolts (1b) to the recommended torque.
| Component | Fastening | dia | Value (daNm) | Validity |
|---|---|---|---|---|
| Ignition coil module | Bolt | M6 | (tappet cover side) 2.2 | 1.9 JTS 2.2 JTS |
- Place the engine electrical wiring in position and fasten it with the bands.
- Connect the electrical connection to the engine coolant temperature sensor.
- Connect the electrical connections to the electronic power module.
- Connect the electrical connections to the cam angle sensors.
- Connect the electrical connections to the phase transformer electromagnets.
- Connect the coolant return pipe, cylinder head side, and tighten the band.
- Place the power assisted steering fluid reservoir complete with pipe in its housing and secure it using the bolts.
- Connect the return pipe from the heat exchanger to the power assisted steering fluid reservoir, reservoir side and tighten the band.
- Connect the supply pipe from the fluid reservoir to the power assisted steering pump, power assisted steering pump side, and tighten the band.
- Connect the supply pipe from the pump to the power assisted steering box, power assisted steering pump side, and tighten the connector to the recommended torque.
| Component | Fastening | dia | Value (daNm) | Validity |
|---|---|---|---|---|
| Supply pipe from pump to power assisted steering box | Connector | M16 | (power assisted steering pump side) 3.6 - 4.4 |
Op. 1048A28 VACUUM AIR CIRCUIT RESONATOR PIPE - R+R
- Connect the negative battery terminal.
Op. 0010T71 POWER STEERING FLUID CHECK LEVEL AND TOP UP IF NECESSARY
Parts & tools for this job Staging For 2005 Alfa Romeo Brera
- PARTEngine gasket setSearch: Alfa Romeo Brera 2005 engine gasket set
- TOOLTorque wrenchSearch: 3/8 inch torque wrench
- TOOLFeeler gauge setSearch: feeler gauge set
Links open Amazon search results in a new tab. As an Amazon Associate I earn from qualifying purchases.