
Piston/cylinder liner - r r
- Make
- Lancia
- Model
- Ypsilon Factory Service Manual
- Year
- 2003–2011
- Section
- Pistons and connecting rods › Piston/cylinder liner - r r
Piston/cylinder liner - r r
Dismantling
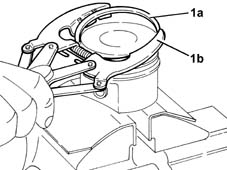
1. Remove the seals (1a) from the piston using the tool (1b).
| Name | Country | |
|---|---|---|
| 1b | Tool for Extracting/Fitting | 1.860.183.000 |
Dismantling
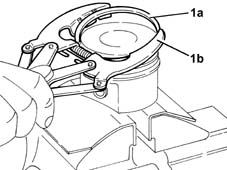
1. Remove the seals (1a) from the piston using the tool (1b).
| Name | Country | |
|---|---|---|
| 1b | Tool for Extracting/Fitting | 1.860.183.000 |
Dismantling
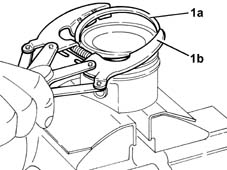
1. Remove the seals (1a) from the piston using the tool (1b).
| Name | Country | |
|---|---|---|
| 1b | Tool for Extracting/Fitting | 1.860.183.000 |
Dismantling
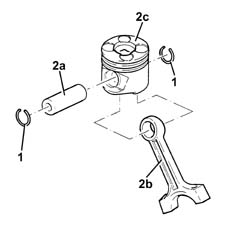
1. Remove the circlips.
2. Remove the pin (2a) and separate the connecting rod (2b) from the piston (2c).
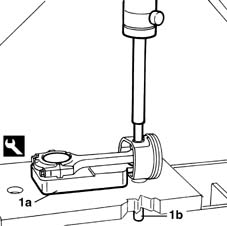
1. Fit the connecting rod-piston assembly on the tool (1a) then, using a hydraulic press and a suitable drift, extract the pin (1b) from the piston.
| Name | Country | |
|---|---|---|
| 1a | Support | 1.860.986.000 |
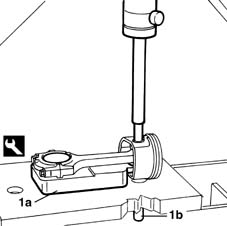
1. Position the connecting rod-piston assembly on the tool (1a) then, using a hydraulic press and a suitable drift, extract the pin (1b) from the piston.
| Name | Country | |
|---|---|---|
| 1a | Support | 1.860.986.000 |
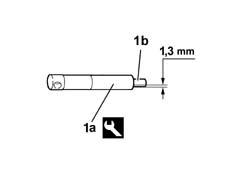
1. To remove the pin from the piston, tool (1a) must be modified to reduce diameter (1b) by 1.3 mm as shown in the figure.
| Name | Country | |
|---|---|---|
| 1a | Support | 1.860.986.000 |
Reassembling
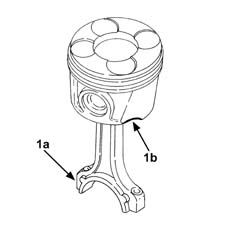
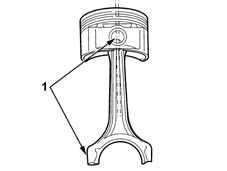
1. Join the connecting rods to the pistons so that the number stamped on the big end (1a) is facing the reference (1b) on the piston skirt where the oil jet is housed.
Fit the pins and secure them using the circlips.
Reassembling
Heat the connecting rods in an oven to a temperature of around 240 °C to allow the fitting of the gudgeon pin.
1. Join the connecting rods to the pistons so that the gudgeon pin offset is facing the number stamped on the big end.
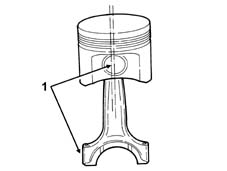
Reassembling
Heat the connecting rods in an oven to a temperature of around 240 °C to allow the fitting of the gudgeon pin.
1. Join the connecting rods to the pistons so that the gudgeon pin offset is facing the number stamped on the big end.
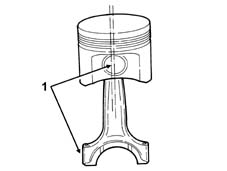
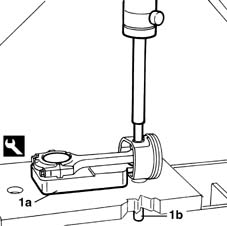
1. Position the connecting rod - piston assembly on mount (1a), then use a hydraulic press and the tool modified previously to remove pin (1b) from the piston.
| Name | Country | |
|---|---|---|
| 1a | Support | 1.860.986.000 |
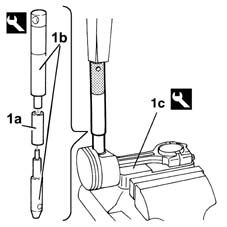
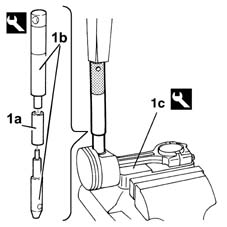
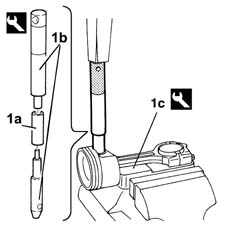
1. Fit the gudgeon pin (1a) using the tool (1b) working in the vice with the connecting rod supported by the tool (1c).
Fit the gudgeon pin in the direction shown by the arrow on the piston crown.
| Name | Country | |
|---|---|---|
| 1b | Support | 1.860.986.000 |
| Name | Country | |
|---|---|---|
| 1c | Support | 1.860.986.000 |
1. Fit the gudgeon pin (1a) using the tool (1b) working in the vice with the connecting rod supported by the tool (1c).
| Name | Country | |
|---|---|---|
| 1b | Support | 1.860.986.000 |
| Name | Country | |
|---|---|---|
| 1c | Support | 1.860.986.000 |
Reassembling
Heat the connecting rods in an oven to a temperature of around 240 °C to allow the fitting of the gudgeon pin.
1. Join the connecting rods to the pistons so that the gudgeon pin offset is facing the number stamped on the big end.
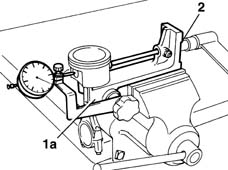
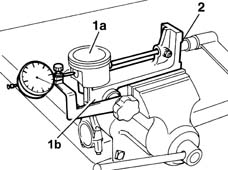
1. Test the gudgeon pin fit locking the connecting rod-piston assembly in the supporting tool (1a) and positioning a dial gauge for measuring the movement of the pin.
2. Act on the tool nut using a torque wrench set at a torque of 1.27 daNm equal to an axial load of 392.4 daN. The matching is correct if, when the action of the torque wrench is over and the nut is returned to its original simple contact position, the pointer on the dial gauge returns to zero. If this is not the case, replace the connecting rod.
| Name | Country | |
|---|---|---|
| 1a | Support | 1.895.615.000 |
1. Test the gudgeon pin fit locking the connecting rod-piston assembly in the supporting tool (1a) and positioning a dial gauge for measuring the movement of the pin.
2. Act on the tool nut using a torque wrench set at a torque of 1.27 daNm equal to an axial load of 392.4 daN. The matching is correct if, when the action of the torque wrench is over and the nut is returned to its original simple contact position, the pointer on the dial gauge returns to zero. If this is not the case, replace the connecting rod.
| Name | Country | |
|---|---|---|
| 1a | Support | 1.895.615.000 |
1. Fit the gudgeon pin (1a) using the tool (1b) working in the vice with the connecting rod supported by the tool (1c).
| Name | Country | |
|---|---|---|
| 1b | Support | 1.860.986.000 |
| Name | Country | |
|---|---|---|
| 1c | Support | 1.860.986.000 |
Fit the seals on the piston using the special tool.
| Name | Country | |
|---|---|---|
| Tool for Extracting/Fitting | 1.860.183.000 |
The second seal is fitted with the word TOP facing upwards.
When the fitting is completed, position the notches in the seals so that they are not aligned with the the gudgeon pin axis and are offset from one another by 120°.
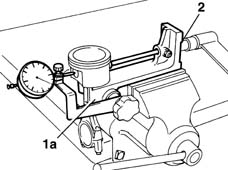
1. Test the gudgeon pin fit locking the connecting rod-piston assembly (1a) in the supporting tool (1b) and positioning a dial gauge for measuring the movement of the pin.
2. Act on the tool nut using a torque wrench set at a torque of 1.27 daNm equal to an axial load of 392.4 daN. The matching is correct if, when the action of the torque wrench is over and the nut is returned to its original simple contact position, the pointer on the dial gauge returns to zero. If this is not the case, replace the connecting rod.
| Name | Country | |
|---|---|---|
| 1b | Support | 1.895.615.000 |
Fit the seals on the piston using the special tool.
| Name | Country | |
|---|---|---|
| Tool for Extracting/Fitting | 1.860.183.000 |
The second seal is fitted with the word TOP facing upwards.
When the fitting is completed, position the notches in the seals so that they are not aligned with the the gudgeon pin axis and are offset from one another by 120°.
Parts & tools for this job Staging For 2003 Lancia Ypsilon
- PARTEngine gasket setSearch: Lancia Ypsilon 2003 engine gasket set
- TOOLTorque wrenchSearch: 3/8 inch torque wrench
- TOOLFeeler gauge setSearch: feeler gauge set
Links open Amazon search results in a new tab. As an Amazon Associate I earn from qualifying purchases.