
Alternator - r+r
- Make
- Lancia
- Model
- Ypsilon Factory Service Manual
- Year
- 2003–2011
- Section
- Current generator › Alternator - r+r
Alternator - r+r
Removing
Place the vehicle on a lift.
- 4450B04 right front wheel r r
- 7055B91 Right front WHEEL ARCH LINER - R.R.
- 7055B66 Engine compartment DUST SHIELD protection in right front wheel arch - R.R.
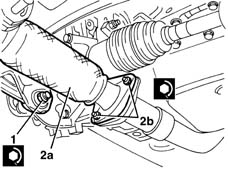
1. Undo the fixing nuts (1a) and disconnect the exhaust pipe (1b).
2. Undo the bolt with nut (2a) for the power unit reaction rod (2b).
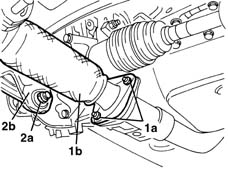
Removing
Position the vehicle on the ramp.
Ensure that the ignition key is in the OFF position, then loosen the bolt and disconnect the battery negative (-) terminal.
| Name | Connector | |
|---|---|---|
| Battery | A1B |
Proceed with removal - 4450B04 right front wheel r r.
Proceed with removal - 7055B66 Engine compartment DUST SHIELD protection in right front wheel arch - R.R..
Proceed with removal - 7055B91 Right front WHEEL ARCH LINER - R.R..
Proceed with removal - 1092G10 single engine belt r r.
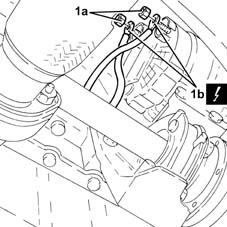
1. Undo the nuts (1a) and disconnect the electrical connections (1b) from the alternator.
| Name | Connector | |
|---|---|---|
| 1b | Alternator | A10 |
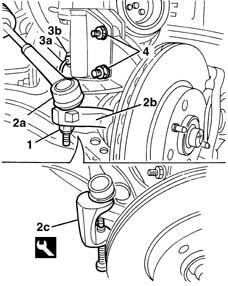
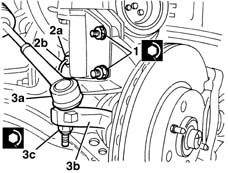
1. Slacken the steering tie-rod nut.
2. Disconnect steering link (2a) from front hub steering knuckle (2b) using tool (2c).
| Name | Country | |
|---|---|---|
| 2c | Extractor | 1.871.000.700 |
3. Release ABS wiring (3a) from retaining bands (3b).
4. Undo and remove the bolts with nut fixing the strut to the shock absorber.
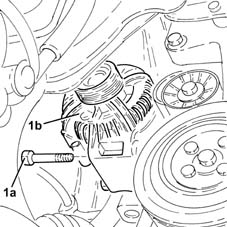
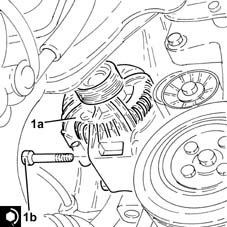
1. Undo the bolts (1a) and remove the alternato (1b).
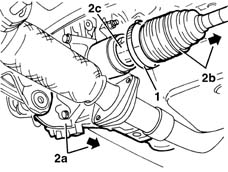
1. Remove the right hald-axle gaiter boot retaining band.
2. Move the power unit (2a) slightly forward and pull half-axle (2b) to the right, disconnecting it from gearbox joint (2c).
Refitting
1. Place the alternator(1a) back in its housing and secure it tightening the bolts (1b) to the recommended torque.
| Fastening | Component | Ø | Value (daNm) | |
|---|---|---|---|---|
| 1b | Bolt | ALTERNATOR ASSEMBLY | M8 | (Support side) 2.3 ÷ 2.8 |
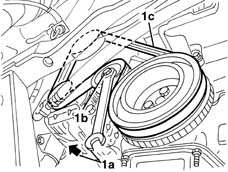
1. Fit a spanner (1a) in the services belt tensioner socket (1b) and rotate it in the direction of the arrow, then release and remove the services belt (1c).
Connect the electrical connections to the alternator and fix them using the nuts.
Proceed with refitting - 1092G10 single engine belt r r.
Proceed with refitting - 7055B91 Right front WHEEL ARCH LINER - R.R..
Proceed with refitting - 7055B66 Engine compartment DUST SHIELD protection in right front wheel arch - R.R..
Proceed with refitting - 4450B04 right front wheel r r.
Connect the negative (-) battery terminal.
Remove the vehicle from the ramp.
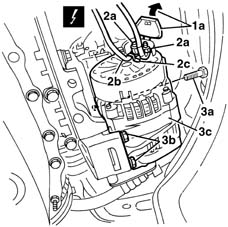
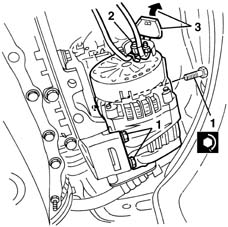
1. Release and remove alternator electrical connections (1a).
2. Undo nuts (2a) and disconnect electrical connections (2b) and (2c) from the alternator.
| Name | Connector | |
|---|---|---|
| 2b | Starter motor | A20A |
| Name | Connector | |
|---|---|---|
| 2c | Starter motor | A20B |
3. Undo upper bolt (3a) and lower bolts (3b), then remove alternator (3c).
Refitting
Check that the alternator is not damaged.
1. Place the alternator back in its housing and fix it tightening the bolts to the recommended torque.
| Fastening | Component | Ø | Value (daNm) | |
|---|---|---|---|---|
| 1 | Bolt | ALTERNATOR ASSEMBLY | M10 | 4.5 ÷ 5.5 |
2. Connect the electrical connections to the alternator and fix them using the nuts.
3. Reclose the electrical connection cover.
Refit the service belt, moving the tensioner by inserting the wrench in the fitting.
Reconnect the half-axle to the joint on the gearbox.
Position the half-axle gaiter and secure with the band.
1. Refit the bolts with nut securing the strut to the shock absorber and tighten to the specified torque.
| Fastening | Component | Ø | Value (daNm) | |
|---|---|---|---|---|
| 1 | Bolt | FRONT HUB STEERING KNUCKLE. | M10 | 6.2 ÷ 6.8 |
2. Do up ABS sensor wiring (2b) to retainer (2a).
3. Connect steering link (3a) to front wheel hub strut (3b), then tighten nut (3c) and tighten to the specified torque.
| Fastening | Component | Ø | Value (daNm) | |
|---|---|---|---|---|
| 3c | Nut | STEERING LINK | M10 | 3.6 ÷ 4.4 |
1. Refit the power unit reaction link bolt with nut and tighten.
2. Reconnect exhaust pipe (2a) and tighten nuts (2b) to the specified torque.
| Fastening | Component | Ø | Value (daNm) | |
|---|---|---|---|---|
| 2b | Nut | EXHAUST PIPE FLANGE | M8 | 2.3 ÷ 2.8 |
- 7055B66 Engine compartment DUST SHIELD protection in right front wheel arch - R.R.
- 7055B91 Right front WHEEL ARCH LINER - R.R.
- 4450B04 right front wheel r r
Remove the vehicle from the lift.
Parts & tools for this job Staging For 2003 Lancia Ypsilon
- TOOLBattery testerSearch: car battery tester
- TOOLDigital multimeterSearch: automotive digital multimeter
- TOOLBattery terminal cleanerSearch: battery terminal cleaner
Links open Amazon search results in a new tab. As an Amazon Associate I earn from qualifying purchases.