
Coolant change
- Make
- Fiat
- Model
- Panda Factory Service Manual
- Year
- 2003–2012
- Section
- New units and planned maintenance › Coolant change
Coolant change
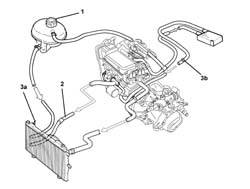
Drain the engine cooling system following the instructions below.
When the engine is hot, do not remove the tank cap; there is a danger of burn injury.
1. Unscrew the expansion tank.
Position a suitable container beneath the radiator to collect the coolant.
2. Disconnect the lower radiator hose and drain the engine coolant.
The engine coolant damages paintwork. avoid any contact with painted surfaces.
3. Open the bleed valves on the radiator (3a) and the heater coolant pipe (3b) and wait until the cooling system is completely drained.
Drain the engine cooling system following the instructions below.
When the engine is hot, do not remove the tank cap; there is a danger of burn injury.
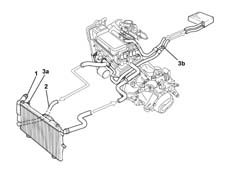
1. Unscrew the expansion tank.
Position a suitable container beneath the radiator to collect the coolant.
2. Disconnect the lower radiator hose and drain the engine coolant.
The engine coolant damages paintwork. avoid any contact with painted surfaces.
3. Open the bleed valves on the radiator (3a) and the heater coolant pipe (3b) and wait until the cooling system is completely drained.
Drain the engine cooling system following the instructions below.
When the engine is hot, do not remove the tank cap; there is a danger of burn injury.
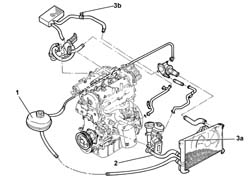
1. Unscrew the expansion tank.
Position a suitable container beneath the radiator to collect the coolant.
2. Disconnect the lower radiator hose and drain the engine coolant.
The engine coolant damages paintwork. avoid any contact with painted surfaces.
3. Open the bleed valves on the radiator (3a) and the heater coolant pipe (3b) and wait until the cooling system is completely drained.
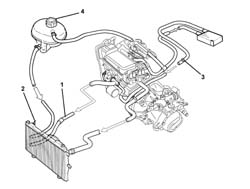
Fill the cooling system as follows:
Take a sufficient quantity of coolant.
| Type | Component | Name | Qty. | |
|---|---|---|---|---|
| Fluid (l) | ENGINE COOLING CIRCUIT | PARAFLU UP | 4.6 |
1. Connect the lower engine radiator hose and secure with a new collar
Gently introduce coolant into the reservoir taking care not to exceed the MAX reference.
2. Open the bleed valve on the radiator as soon as coolant begins to emerge from the threaded hole in the bleed valve.
3. Continue refilling the system and tighten the bleed screw on the heater pipe as soon as engine coolant comes out.
Complete the engine coolant refilling operation when the MAX reference mark on the reservoir is reached.
4. Close the expansion tank cap.
Start up the engine and keep it idling for at leas 2 minutes.
Pump the accelerator at intervals gradually to take engine speed up to 3000 rpm. This operation should be carried out until the engine cooling fan comes on at least three times.
Turn off the engine and wait for the coolant to cool down.
Check that the coolant level is between the MIN and MAX marks on the expansion tank.
If necessary, top up the level by unscrewing the cap and adding coolant.
The quantity of fluid introduced should correspond to at least the amount collected whilst draining the circuit; if this is not the case, top up and repeat the bleeding procedure.
| Type | Component | Name | Qty. | |
|---|---|---|---|---|
| Fluid (l) | ENGINE COOLING CIRCUIT | PARAFLU UP | 4.6 |
Never exceed the MAX level.
Fill the cooling system as follows:
Take a sufficient quantity of coolant.
| Type | Component | Name | Qty. | |
|---|---|---|---|---|
| Fluid (l) | ENGINE COOLING CIRCUIT | PARAFLU UP | 4.48 |
1. Connect the lower engine radiator hose and secure with a new collar
Gradually introduce coolant into the reservoir until fluid comes out of the bleed valve on the radiator.
2. Open the bleed valve on the radiator as soon as coolant begins to emerge from the threaded hole in the bleed valve.
3. Continue refilling the system and tighten the bleed screw on the heater pipe as soon as engine coolant comes out.
Complete the engine coolant refilling operation when the MAX reference mark on the reservoir is reached.
4. Close the expansion tank cap.
Start up the engine and keep it idling for at leas 2 minutes.
Pump the accelerator at intervals gradually to take engine speed up to 3000 rpm. This operation should be carried out until the engine cooling fan comes on at least three times.
Turn off the engine and wait for the coolant to cool down.
Check that the coolant level is between the MIN and MAX marks on the expansion tank.
If necessary, top up the level by unscrewing the cap and adding coolant.
The quantity of fluid introduced should correspond to at least the amount collected whilst draining the circuit; if this is not the case, top up and repeat the bleeding procedure.
| Type | Component | Name | Qty. | |
|---|---|---|---|---|
| Fluid (l) | ENGINE COOLING CIRCUIT | PARAFLU UP | 4.48 |
Never exceed the MAX level.
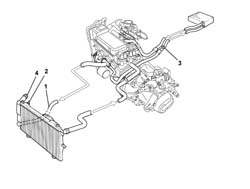
Fill the cooling system as follows:
Take a sufficient quantity of coolant.
It is recommended that you use a 50% mixture of PARAFLU UP hydrogen peroxide.
| Type | Component | Name | Qty. | |
|---|---|---|---|---|
| Fluid (l) | ENGINE COOLING CIRCUIT | PARAFLU UP | 6.5 |
1. Connect the lower engine radiator hose and secure with a new collar
Gently introduce coolant into the reservoir taking care not to exceed the MAX reference.
2. Open the bleed valve on the radiator as soon as coolant begins to emerge from the threaded hole in the bleed valve.
3. Continue refilling the system and tighten the bleed screw on the heater pipe as soon as engine coolant comes out.
Complete the engine coolant refilling operation when the MAX reference mark on the reservoir is reached.
4. Close the expansion tank cap.
Start up the engine and keep it idling for at least 2 minutes.
Pump the accelerator at intervals gradually to take engine speed up to 3000 rpm. This operation should be carried out until the engine cooling fan comes on at least three times.
Turn off the engine and wait for the coolant to cool down.
Check that the coolant level is between the MIN and MAX marks on the expansion tank.
If necessary, top up the level by unscrewing the cap and adding coolant.
The quantity of fluid introduced should correspond to at least the amount collected whilst draining the circuit; if this is not the case, top up and repeat the bleeding procedure.
It is recommended that you use a 50% mixture of PARAFLU UP hydrogen peroxide.
| Type | Component | Name | Qty. | |
|---|---|---|---|---|
| Fluid (l) | ENGINE COOLING CIRCUIT | PARAFLU UP | 6.5 |
Never exceed the MAX level.
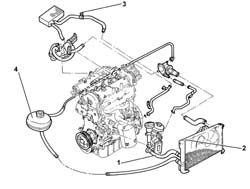
Parts & tools for this job Staging For 2003 Fiat Panda
- FLUIDCoolantSearch: Fiat coolant antifreeze
- PARTThermostatSearch: Fiat Panda 2003 thermostat
- TOOLCooling system pressure testerSearch: cooling system pressure tester
Links open Amazon search results in a new tab. As an Amazon Associate I earn from qualifying purchases.