
Single cylinder head, removed - overhaul
- Make
- Alfa Romeo
- Model
- Brera and Spider Factory Service Manual
- Year
- 2005–2010
- Section
- Cylinder head/s › Single cylinder head, removed - overhaul
SINGLE CYLINDER HEAD, REMOVED - OVERHAUL
Removing
1. Position the cylinder head in the vice using the support tool.
| Tool | Description | Function | Validity |
|---|---|---|---|
| 1860470001 | Support | Overhaul cylinder head |
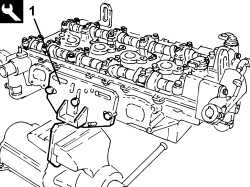
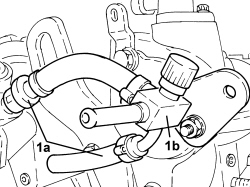
1. Disconnect the pipes (1a) and remove the three-way connector (1b).
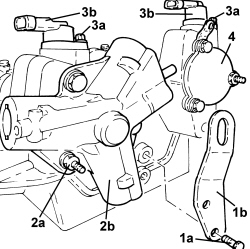
1. Undo the nuts (1a) and remove the lifting bracket (1b).
2. Undo the fastenings (2a) and remove the pressure pump (2b).
3. Undo the bolts (3a) and remove the two timing sensors (3b).
4. Undo the fastenings and remove the camshaft rear cap cover.
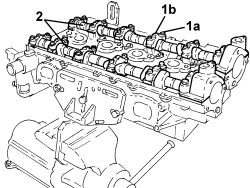
- Mark the position of the camshafts.
1. Undo the bolts (1a) and remove the camshaft caps (1b).
The rear inlet side camshaft cap has silicon sealant therefore a plastic hammer should be used for the removal.
2. Remove the camshafts.
- Remove the camshaft front oil seals.
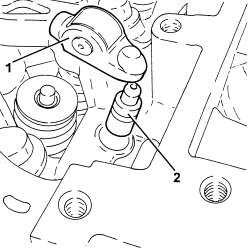
1. Remove the tappet rocker arms.
2. Remove the hydraulic tappets.
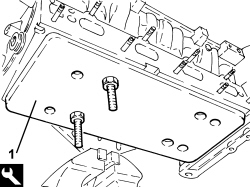
1. Fit the valve support under the head.
| Tool | Description | Function | Validity |
|---|---|---|---|
| 2000003400 | Support | Valve support | 1.9 JTS 2.2 JTS |
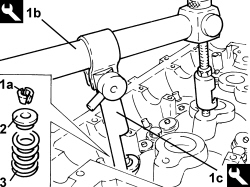
1. Fit the cotters (1a) using the tools (1b) and (1c).
2. Remove the valve upper shim.
3. Remove the valve spring.
| Tool | Description | Function | Validity |
|---|---|---|---|
| 1821058000 | Lever | Valve spring compression lever | 1.9 JTS 2.2 JTS 1.9 JTD 8V |
| Tool | Description | Function | Validity |
|---|---|---|---|
| 2000002700 | Chamber | Valve spring compression | 1.9 JTS 2.2 JTS |
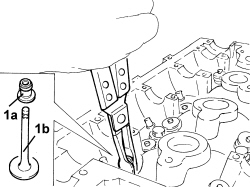
1. Remove the valve guide oil seals (1a) with built in lower shim and the valve (1b).
Refitting
- Clean the contact surfaces between the cylinder head and the crankcase.
COMBUSTION CHAMBER WITH THE POINT FOR MEASURING THE DEPTH SHOWN
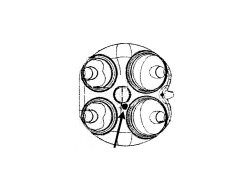
- The lower cylinder head plane can be refaced if the flatness is not within the recommended values.
| Measurement | Value | Validity | ||
|---|---|---|---|---|
| Cylinder head lower surface flatness | 0.05 - 0.15 mm | 1.9 JTS 2.2 JTS | ||
- The refacing does not have to be carried out for lower flatness values.
- The refacing is not permitted for higher flatness values.
- After refacing it is necessary to check that the minimum depth for each combustion chamber is 12.75 mm (at the point shown in the diagram above) in order to guarantee the minimum combustion chamber volume.
- Check that the valves do not show signs of grooves or seizing.
- Check that the diameter of the valve stems corresponds to the recommended figures; if not, replace the worn valves.
| Measurement | Value | Validity |
|---|---|---|
| Inlet valve stem diameter | 5.900 - 5.940 mm | 1.9 JTS 2.2 JTS |
| Measurement | Value | Validity |
|---|---|---|
| Exhaust valve stem diameter | 5.900 - 5.940 mm | 1.9 JTS 2.2 JTS |
- Check that the diameter of the valve head corresponds to the recommended figures; if not, replace the worn valves.
| Measurement | Value | Validity |
|---|---|---|
| Inlet valve head diameter | 34.95 - 35.25 mm | 1.9 JTS 2.2 JTS |
| Measurement | Value | Validity |
|---|---|---|
| Exhaust valve head diameter | 29.95 - 30.25 mm | 1.9 JTS 2.2 JTS |
- Check that the nominal camshaft cam lift corresponds to the recommended figures; if not, replace the worn camshaft.
| Measurement | Value | Validity |
|---|---|---|
| Nominal inlet cam lift | 10.30 mm | 1.9 JTS 2.2 JTS |
| Measurement | Value | Validity |
|---|---|---|
| Nominal exhaust cam lift | 10.30 mm | 1.9 JTS 2.2 JTS |
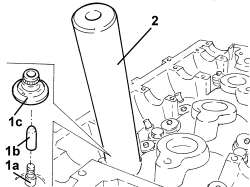
1. Temporarily position the valve (1a) in the seat and fit the tool (1b) for centering the valve guide oil seal (1c) on it.
2. Fit the valve guide oil seal using the tool.
| Tool | Description | Function | Validity |
|---|---|---|---|
| 1860814001 | Drift | Fit valve oil seals | 1.9 JTS 2.2 JTS 1.9 JTD 8V |
| Tool | Description | Function | Validity |
|---|---|---|---|
| 2000002600 | Fitting tool | Valve oil seals | 1.9 JTS 2.2 JTS |
- Position the spring and the upper shim on the valve.
- Place the cotters back in their housings using the tools.
| Tool | Description | Function | Validity |
|---|---|---|---|
| 1821058000 | Lever | Valve spring compression lever | 1.9 JTS 2.2 JTS 1.9 JTD 8V |
| Tool | Description | Function | Validity |
|---|---|---|---|
| 2000002700 | Chamber | Valve spring compression | 1.9 JTS 2.2 JTS |
- Carry out the same operations to refit the remaining bolts.
- Place the camshafts in their housings.
- Place the camshaft caps in their housings and secure them tightening the bolts to the recommended torque.
| Component | Fastening | dia | Value (daNm) | Validity |
|---|---|---|---|---|
| Camshaft rear caps | Bolt | M6 | (cylinder head side) 0.7 - 0.9 | 1.9 JTS 2.2 JTS |
| Component | Fastening | dia | Value (daNm) | Validity |
|---|---|---|---|---|
| Camshaft front/intermediate caps | Bolt | M8 | (cylinder head side) 1.8 - 2.2 | 1.9 JTS 2.2 JTS |
- Place the two timing sensors in their housings and tighten the bolts to the recommended torque.
| Component | Fastening | dia | Value (daNm) | Validity |
|---|---|---|---|---|
| Phase transformer solenoids | Bolt | M6 | (cylinder head side) 1.0 | 1.9 JTS 2.2 JTS 3.2 JTS |
- Place the pressure pump in position and tighten the fastenings to torque.
| Component | Fastening | dia | Value (daNm) | Validity |
|---|---|---|---|---|
| Pressure pump | Bolt | M6 | 1.0 | 1.9 JTS 2.2 JTS |
- Connect the pipes and fit the three-way fuel connector.
Parts & tools for this job Staging For 2005 Alfa Romeo Brera
- PARTEngine gasket setSearch: Alfa Romeo Brera 2005 engine gasket set
- TOOLTorque wrenchSearch: 3/8 inch torque wrench
- TOOLFeeler gauge setSearch: feeler gauge set
Links open Amazon search results in a new tab. As an Amazon Associate I earn from qualifying purchases.