
Outer cover on roof - r.r.
- Make
- Alfa Romeo
- Model
- Brera and Spider Factory Service Manual
- Year
- 2005–2010
- Section
- Mouldings and protection › Outer cover on roof - r.r.
OUTER COVER ON ROOF - R.R.
Removing
1. Apply a double layer of adhesive tape to the body around the edges of the outer trim.
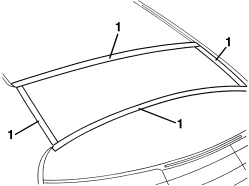
- The outer trim sealant strip may be cut only using piano wire, as described below.
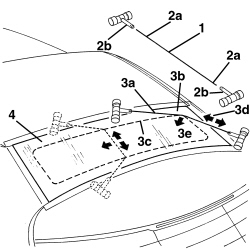
1. Cut a 100 cm long section of piano wire.
2. Secure ends (2a) of the wire to the pulling handles (2b).
3. With the aid of a second operator, insert piano wire (3a) under outer trim (3b) in a corner area as shown in the figure. Start to cut sealant strip (3c), placing piano wire (3a) under tension by means of the handles and moving them alternatively as shown by arrows (3d). Then pull them in arrowed direction (3e) until sealant strip (3c) is fully cut.
4. Remove the outer trim.
Refitting
1. Using suitable equipment, cut and level the bead of sealant in the outer trim housing leaving a thickness of between 0.25 and 1 mm, taking care not to scratch the paintwork. The thickness of the sealant remaining in the housing will act as a support for the new bonding.
2. Thoroughly clean the exterior trim housing using an air jet and degrease fully using heptane.
3. Apply the required spacers to prevent the glass sinking.
4. Check the efficiency of the Velcro retainers and replace if necessary.
5. When bonding, 60 minutes after the bead of sealant has been cut and levelled, the surface of the actual sealant must be treated using the special activating product and it is necessary to wait for 15 minutes before fitting the outer trim.
| Component | Type | Description | Classification | Qty. | Validity |
|---|---|---|---|---|---|
| Exterior trim on roof | Activator for PUR |
- If necessary, touch up the paintwork.
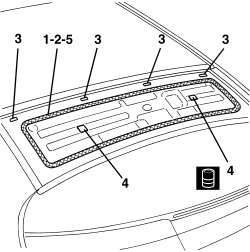
- Preparing a new outer trim.
1. Degrease the screen-printed perimeter of the new outer trim to be bonded using heptane.
2. Apply bond promoting compound to the edge to be bonded.
Wait for about 15 minutes before continuing with the next operation to allow the adhesion promoter (primer) thinner to evaporate.
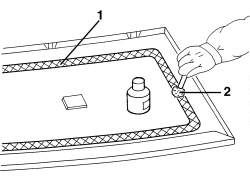
- Preparing a removed outer trim.
1. A removed outer trim may be reused only if it was not damaged during removal.
2. Using suitable equipment cut and level the bead of sealant on the outer trim so that it is as thin as possible.
The remaining sealant does not have to be removed completely.
3. Clean the perimeter of the serigraphed area of the outer trim thoroughly with compressed air and degrease it using heptane.
Check that the outer trim is not damaged.
When bonding, 60 minutes after the bead of sealant has been cut and levelled, the surface of the actual sealant must be treated using the special activating product and it is necessary to wait for 15 minutes before fitting the outer trim.
| Component | Type | Description | Classification | Qty. | Validity |
|---|---|---|---|---|---|
| Exterior trim on roof | Activator for PUR |
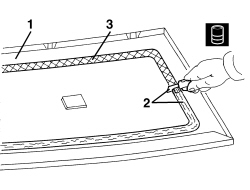
1. Remove the adhesive tape from the edges of the bodywork.
2. Carry out a test fitting and centre the outer trim perfectly.
3. When the trim has been centered, mark the position of the trim in relation to the housing using strips of adhesive tape.
4. Cut the strips of adhesive tape and remove the outer trim.
5. Using a spray gun apply a bead of sealant along the perimeter of the outer trim as evenly as possible.
| Component | Type | Description | Classification | Qty. | Validity |
|---|---|---|---|---|---|
| Exterior trim on roof | Windscreen sealant | Product n° 71711976 |
Start the operation from the centre of the rear side and continue without breaks along the entire perimeter of the outer trim.
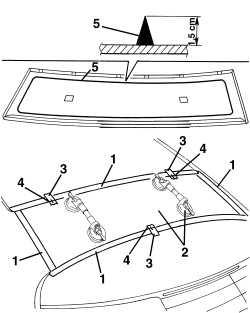
1. Position the outer trim in its seat immedately after applying sealant and settle it into position.
2. Position the belt (2a), as illustrated, and tension it so that even pressure is exerted on the entire outer trim to ensure that the matching between outer trim (2b), sealant (2c) and outer trim (2d) is correct.
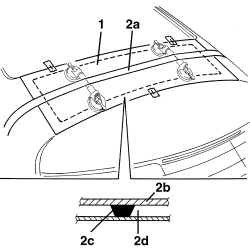
- Check there are not leaks by carrying out a water-tightness test after lowering the rear side of the roof trim as described below.
Op. 7040H38 CENTRE PILLAR UPPER ELEMENT (ONE), LEFT OR RIGHT - R.R
- Remove the rear parcel shelf.
Op. 7040G30 BOOT LIGHT BULB HOLDER - R.R.
1. Working on the right and left pillar trims, detach the bolt covers (1a).
Undo the bolts (1b).
Move and lower the pillar trims (1c) without releasing from seat belts (1d).
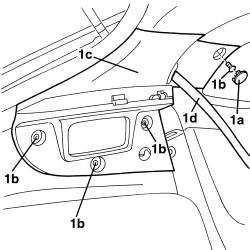
- Prise out the door housing seals in the roof lining area.
- Slightly lower the rear part of the roof lining.
- Carry out a water-tightness test and check for leaks from the inside.
- Refit the removed parts.
Do not move the vehicle for the time recommended by the supplier of the sealant.
Parts & tools for this job Staging For 2005 Alfa Romeo Brera
- TOOLTrim removal tool kitSearch: trim removal tool kit
- PARTTouch-up paintSearch: Alfa Romeo touch up paint
- PARTPanel clip assortmentSearch: Alfa Romeo panel clips assortment
Links open Amazon search results in a new tab. As an Amazon Associate I earn from qualifying purchases.