
Cabin wirirng - r r
- Make
- Alfa Romeo
- Model
- 147 Factory Service Manual
- Year
- 2000–2002
- Section
- Instrument/guage electrical wiring › Cabin wirirng - r r
Cabin wirirng - r r
Removal
NOTE: For precise identification of the electrical connections, see Wiring Diagrams Section.
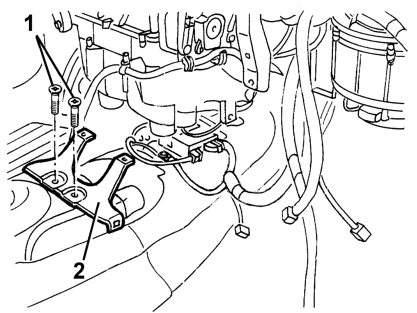
1 Unscrew the bolts
2 Remove the mounting bracket for the air duct to the rear seats.
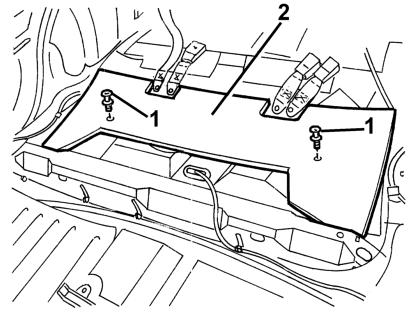
1 Undo the pins anchoring the rear seat.
2 Remove the sound insulation.
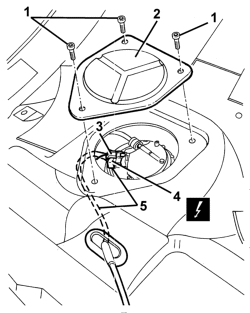
1 Unscrew the bolts
2 Remove the fuel pump access cover.
3 Release the safety tab for the electrical connection.
4 Disconnect the electrical connections.
Component N40 Fuel pump and sender unit 4
5 Release the electrical connection from the passage between the bodyshell and the fuel tank.
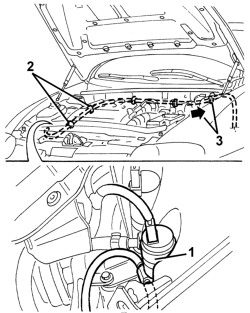
1 Disconnect the rear windscreen wiper pipe from the pump.
2 Disconnect the pipe from the retainers.
3 Release the pipe from the bulkhead passage, after having fitted a sensor to the end to facilitate the refitting.
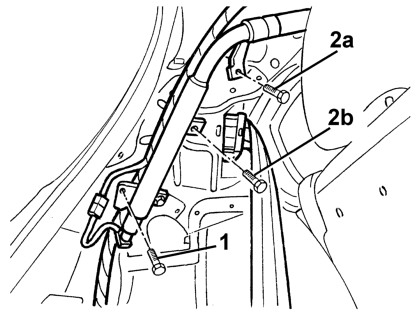
1 Working on both sides of the luggage compartment, undo the Head Bag fixing bolt shown.
2 Working on the left side of the luggage compartment only, loosen the bolt 2a fixing the Head Bag and the bolts 2b fixing the Head Bag and the rear seat belt reel.
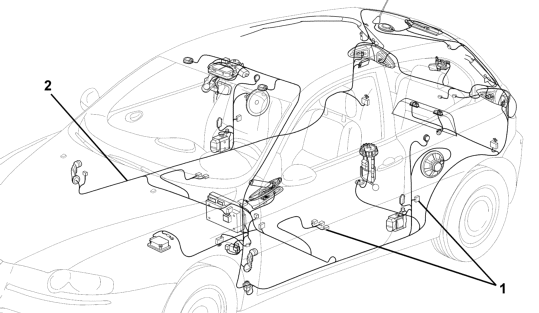
Move aside the carpeting and the parts necessary for removal of the integrated wiring.
1 Disconnect the electrical connections and retainers of the integrated wiring.
2 Remove the integrated wiring.
Refitting
NOTE: For precise identification of the electrical connections, see Wiring Diagrams Section.
Check that the integrated wiring is not damaged and that the individual conductors are firmly attached to the connections.
Check that the connections are fitted with the anti-slip devices (secondary lock).
If necessary, check the continuity.
Position the integrated wiring.
Connect the electrical connection.
Secure the integrated wiring using the retainers.
Refit and secure the carpeting and the parts moved or removed to remove the integrated wiring.
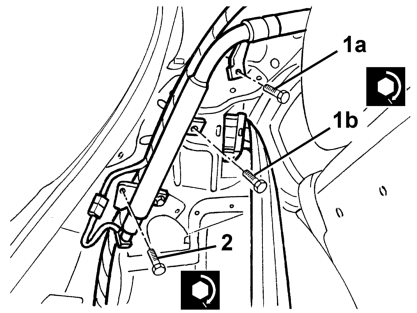
1 Working on the left side of the luggage compartment only, tighten the bolt 1a fixing the Head Bag and the bolt 1b fixing the Head Bag and the rear seat belt reel.
Screw M6 – Head bag unit 1a: 0.8 daNm
Screw 7/16" – 1b: 4.0 daNm
2 Working on both sides of the luggage compartment, tighten the bolt fixing the Head Bag.
Screw M6 – Head bag unit 2: 0.8 daNm
Fit the rear windscreen wiper pipe through the bulkhead passage, using the sensor.
Position the pipe and connect it to the pump and secure it to the retainers.
Fit the electrical connection in the passage between the bodyshell and the fuel tank.
Connect the electrical connection and attach the safety tab.
Position the fuel pump access cover and secure it using the bolts.
Position the sound insulation and tighten the rear seat anchorage pins.
Position the air duct mounting bracket and tighten the bolts.
Parts & tools for this job Staging For 2000 Alfa Romeo 147
- TOOLDigital multimeterSearch: automotive digital multimeter
- PARTAssorted fuse kitSearch: car fuse assortment kit
- TOOLWire crimper and connector kitSearch: wire crimper connector kit
Links open Amazon search results in a new tab. As an Amazon Associate I earn from qualifying purchases.