
REAR AXLE
- Make
- Land Rover
- Model
- Range Rover Classic
- Section
- REPAIR › REAR AXLE
REAR AXLE AND FINAL DRIVE
1
REPAIR
REAR AXLE
Service repair no - 51.25.01
Remove
WARNING: Remove and refit of axle
requires a further two persons to steady
the axle when lowering or repositioning
axle.
1. Drain brake system.
2. Support chassis rear.
3. Remove road wheels.
4. Support axle weight with hydraulic jack.
5. Disconnect ABS wiring harness multi-plug at
jump hose bracket, if applicable.
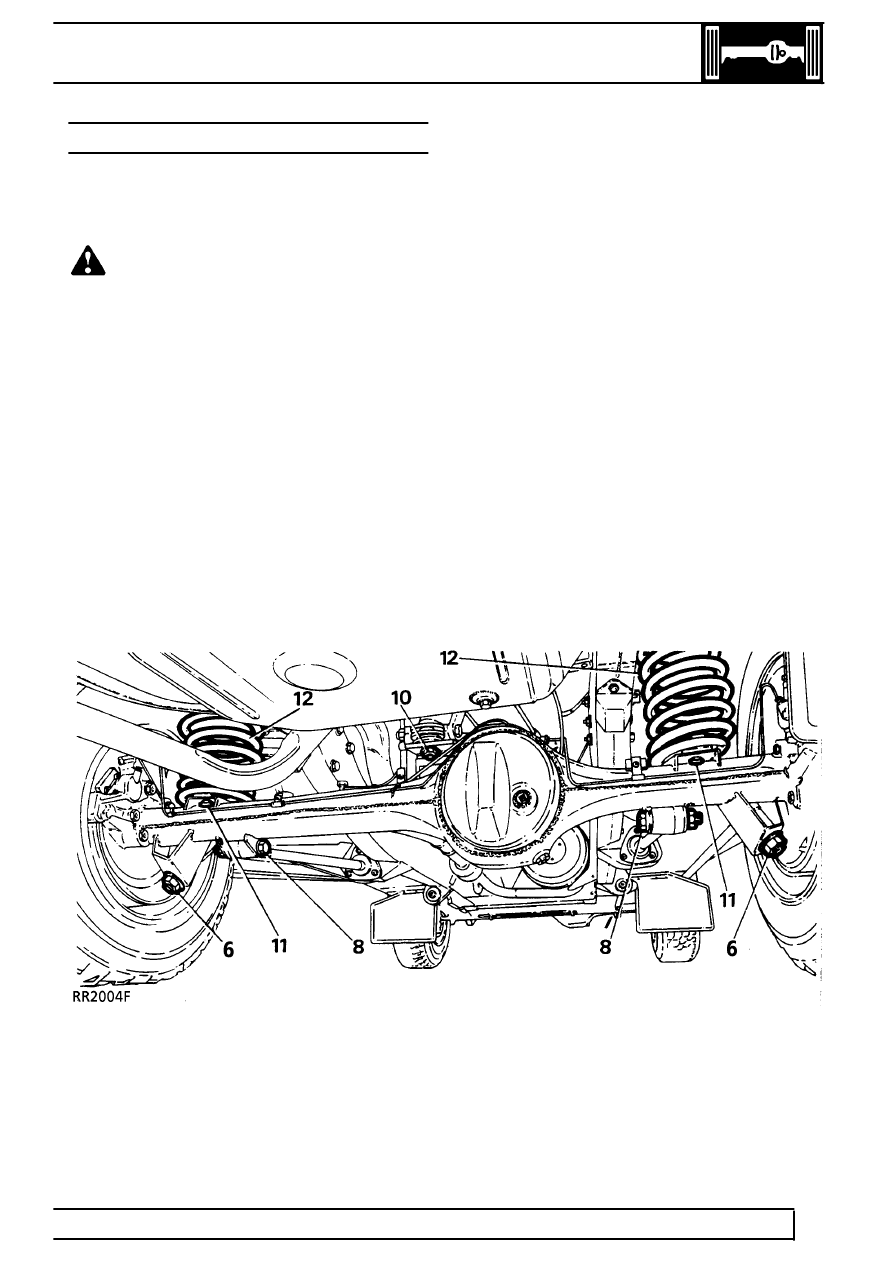
6. Disconnect shock absorbers.
7. Disconnect flexible brake hose at connection
under floor.
8. Disconnect lower links at axle.
9. Mark differential and propeller shaft flanges with
identification marks for assembly. Remove four
nuts and bolts. Lower propeller shaft and tie to
one side.
10. Disconnect pivot bracket ball joint at axle
bracket.
11. Release bolts and remove coil spring retaining
plates.
12. Lower axle and remove road springs.
13. Disconnect anti-roll[sway] bar links to axle.
See
REAR SUSPENSION, Repair, Anti-Roll[Sway]
Bar Ball Joint Links
14. Remove axle assembly.
Refit
15. Position axle and fit lower links. Tighten to
176
Nm
16. Reverse removal procedure.
17. Tighten pivot bracket ball joint to axle to
176 Nm.
18. Tighten propeller shaft to differential drive flange
to
47 Nm
19. Bleed brake system.
See BRAKES, Repair,
Brake System Bleed
Parts & tools for this job Staging For Land Rover Range Rover
- PARTRear wheel bearingSearch: Land Rover Range Rover rear wheel bearing
- TOOLBearing puller kitSearch: wheel bearing puller kit
- PARTCV boot kitSearch: Land Rover Range Rover cv boot kit
Links open Amazon search results in a new tab. As an Amazon Associate I earn from qualifying purchases.