
ASSEMBLE (page 2 of 6)
- Make
- Land Rover
- Model
- Defender 300Tdi Defender
REAR AXLE AND FINAL DRIVE
5
OVERHAUL
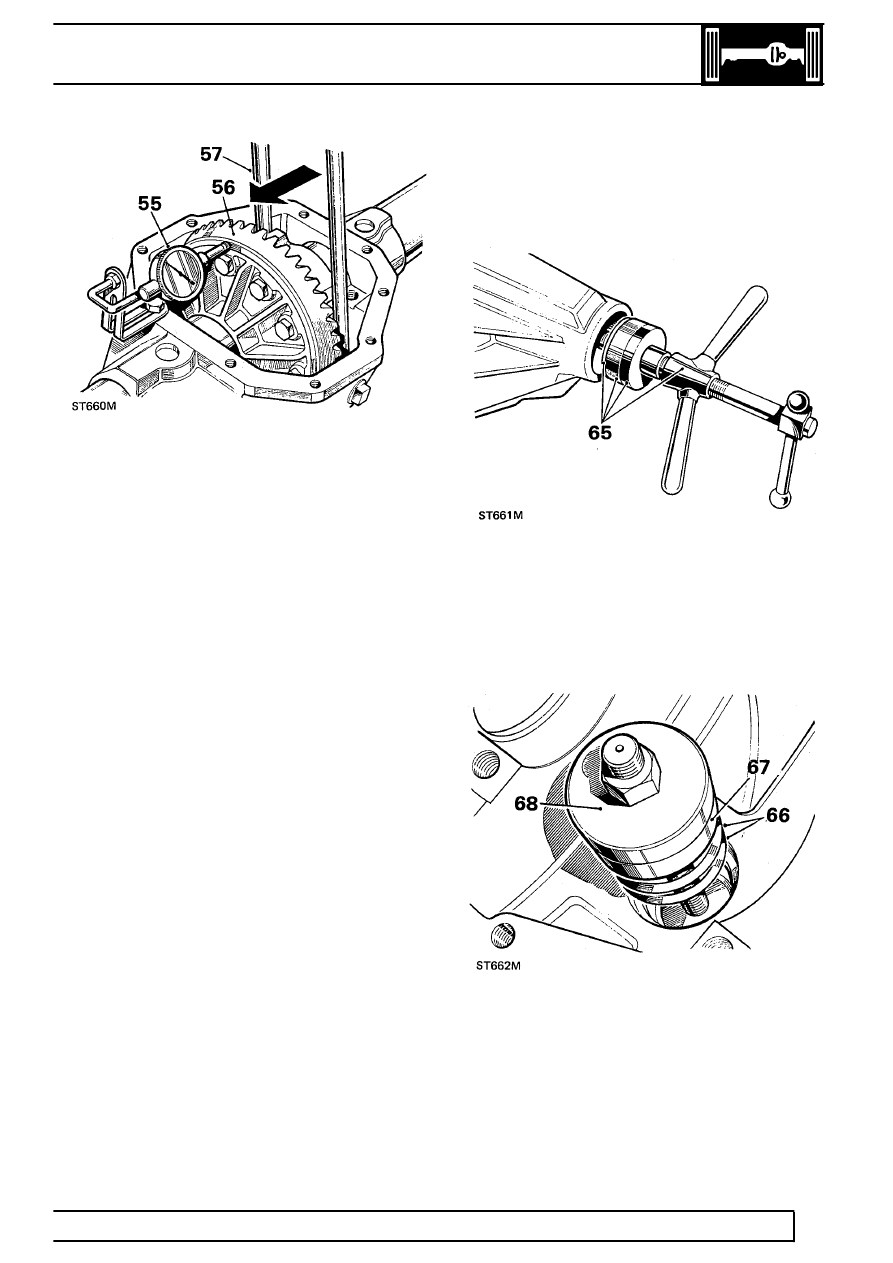
55. Position a suitable dial gauge indicator on casing
with stylus registering on back face of crown
wheel.
56. Rotate differential and check total indicated
run-out on crown wheel back face. This must not
exceed 0,05 mm. If run-out is excessive, check
mating faces for dirt and damage; if necessary,
select a new radial position for crown wheel.
When satisfactory, continue with following check.
Differential bearing adjustment
57. Insert two levers between casing and differential
unit at one side.
58. Move differential unit fully to one side of casing;
do not tilt unit.
59. Rotate differential unit to settle bearings,
continue to lever differential to side, then zero
dial gauge indicator.
60. Lever assembly fully to other side of casing,
rotate unit to settle bearings, then note total
indicator reading.
61. Add 0,127 mm, for bearing pre-load, to total
noted in preceding instruction. The sum is then
equal to nominal value of shims required for
differential bearings. Shims are available in
range 0,07 mm, 0,12 mm, 0,25 mm and 0,76
mm. Select total value of shims required.
62. Remove differential unit and bearings and place
aside. Do not fit shim washers until subsequent
’Differential backlash’ checks have been made,
instructions 96 to 102.
Fit drive pinion
63. Select shim washers of same thickness value as
those removed from under pinion inner cup,
instruction 35, and place ready for fitting.
64. Position outer bearing replacer LRT-51-505,
detail 2, and outer bearing cup on press
LRT-99-502.
65. Locate assembly into pinion housing nose.
66. Place selected shim washers on to inner bearing
cup seating.
67. Position inner bearing cup in casing.
68. Position inner bearing replacer LRT-51-505,
detail 1, onto LRT-99-502 and secure with fixing
nut.
69. Hold still centre screw and turn butterfly lever to
draw in bearing cups.
Parts & tools for this job Staging For Land Rover Defender
- PARTRear wheel bearingSearch: Land Rover Defender rear wheel bearing
- TOOLBearing puller kitSearch: wheel bearing puller kit
- PARTCV boot kitSearch: Land Rover Defender cv boot kit
Links open Amazon search results in a new tab. As an Amazon Associate I earn from qualifying purchases.