
R380 GEARBOX (page 5 of 6)
- Make
- Land Rover
- Model
- Defender 300Tdi Defender
MANUAL GEARBOX
5
REPAIR
Separating transfer gearbox from main gearbox
50. Remove transmission assembly from hoist
cradle and position safely on a bench.
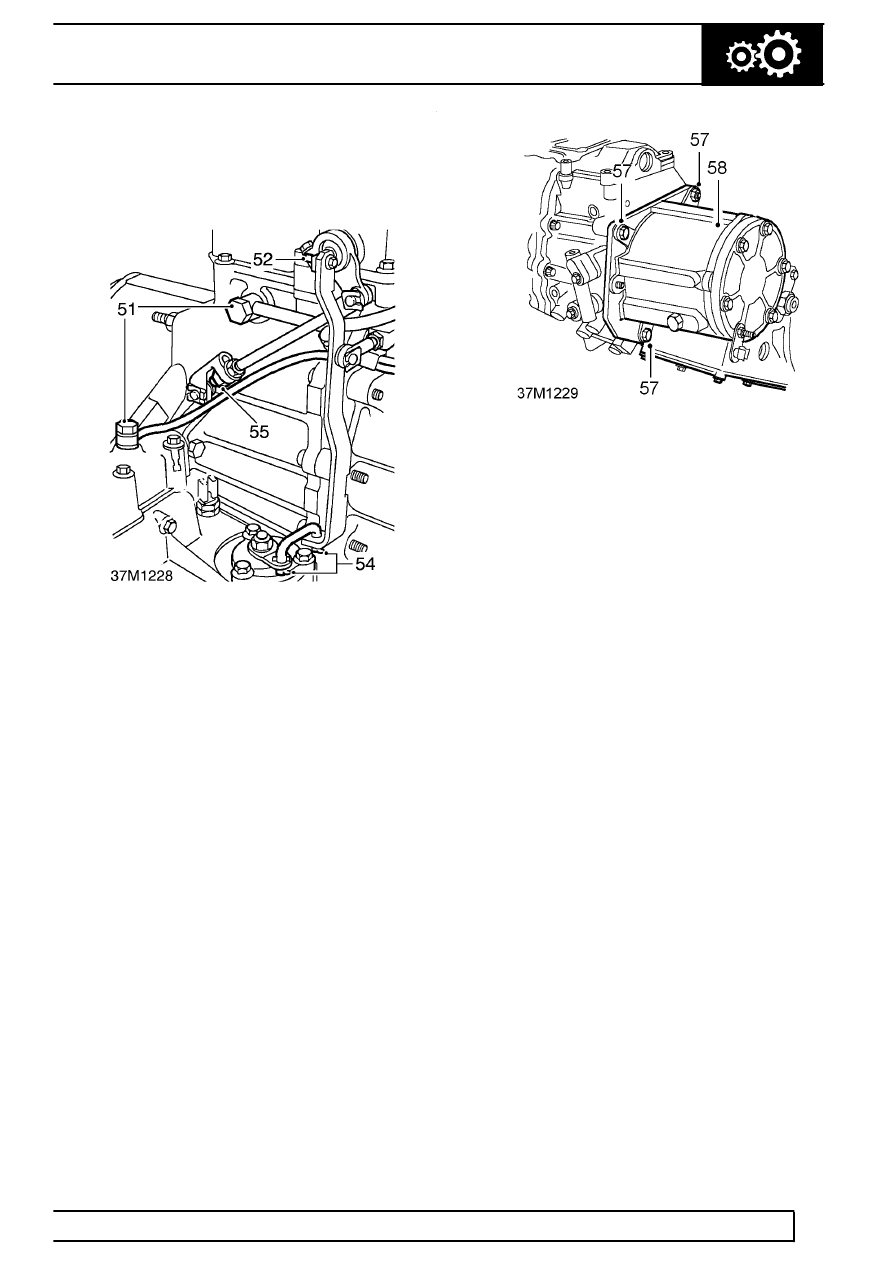
51. Remove breather pipes. Discard pipe union
sealing washers.
52. Remove ’Nyloc’ nut, and remove bolt, securing
lever to high/low shaft.
53. Collect spacer washer.
54. Remove 2 clips and remove differential lock
lever link.
55. Remove lower locknut from high/low operating
rod.
56. Place a sling round transfer box and attach to
hoist.
57. Remove nut and 4 bolts securing transfer
gearbox to extension housing.
58. Withdraw transfer gearbox.
Assembling transfer gearbox to main gearbox
59. Clean extension housing and transfer gearbox
mating faces.
60. Ensuring loose upper dowel is fitted, hoist
transfer gearbox into position.
61. Secure transfer box to extension housing.
Tighten fixings to
40 Nm (30 lbf/ft).
62. Connect high/low operating rod, fit and tighten
locknut.
63. Fit link to differential lock lever and secure with 2
clips
64. Align lever to high/low shaft, position washer, fit
bolt and new Nyloc nut. Tighten to
2 Nm (1.5
lbf/ft).
65. Position breather pipes, secure pipe unions
using new sealing washers. Tighten unions to
15
Nm (11 lbf/ft).
Fitting transfer gearbox and main gearbox
assembly
66. Position transmission assembly to hoist cradle.
67. Clean bell housing and engine mating faces.
Apply sealant to both mating faces.
68. Temporarily fit gear lever and select any gear in
main gearbox to facilitate entry of gearbox input
shaft. Engage low range.
69. Position and raise hoist, fit transmission to
engine whilst keeping harness and pipes clear to
prevent trapping.
70. Secure transmission to engine. Tighten fixings to
45 Nm (33 lbf/ft).
71. Secure earth leads to RH side of transfer box.
72. Connect reverse lamp switch connectors and
differential lock switch connectors.
73. Secure breather pipes to harness with clips.
74. Remove support from engine sump.
75. Position temporary support under transmission.
76. Secure LH and RH mounting brackets to
gearbox. Tighten fixings to
55 Nm (41 lbf/ft).
77. With assistance and using a body jack between
chassis longitudinals, jack chassis sufficiently to
enable fitment of crossmember.
Parts & tools for this job Staging For Land Rover Defender
- PARTClutch kitSearch: Land Rover Defender clutch kit
- TOOLClutch alignment toolSearch: clutch alignment tool
- FLUIDGear oilSearch: Land Rover Defender manual gearbox oil
Links open Amazon search results in a new tab. As an Amazon Associate I earn from qualifying purchases.