
FRONT BRAKE CALIPERS
- Make
- Land Rover
- Model
- Range Rover Classic
- Section
- REPAIR › FRONT BRAKE CALIPERS
70
BRAKES
14
REPAIR
FRONT BRAKE CALIPERS
Service repair no - 70.55.03
Service repair no - 70.55.16
Service tool:
LRT-70-500 - Piston clamp
NOTE: Pad wear warning indicators are
incorporated into front and rear RH
inboard pads.
Remove caliper
1. Loosen front wheel retaining nuts, raise front of
vehicle, lower onto axle stands, remove wheels.
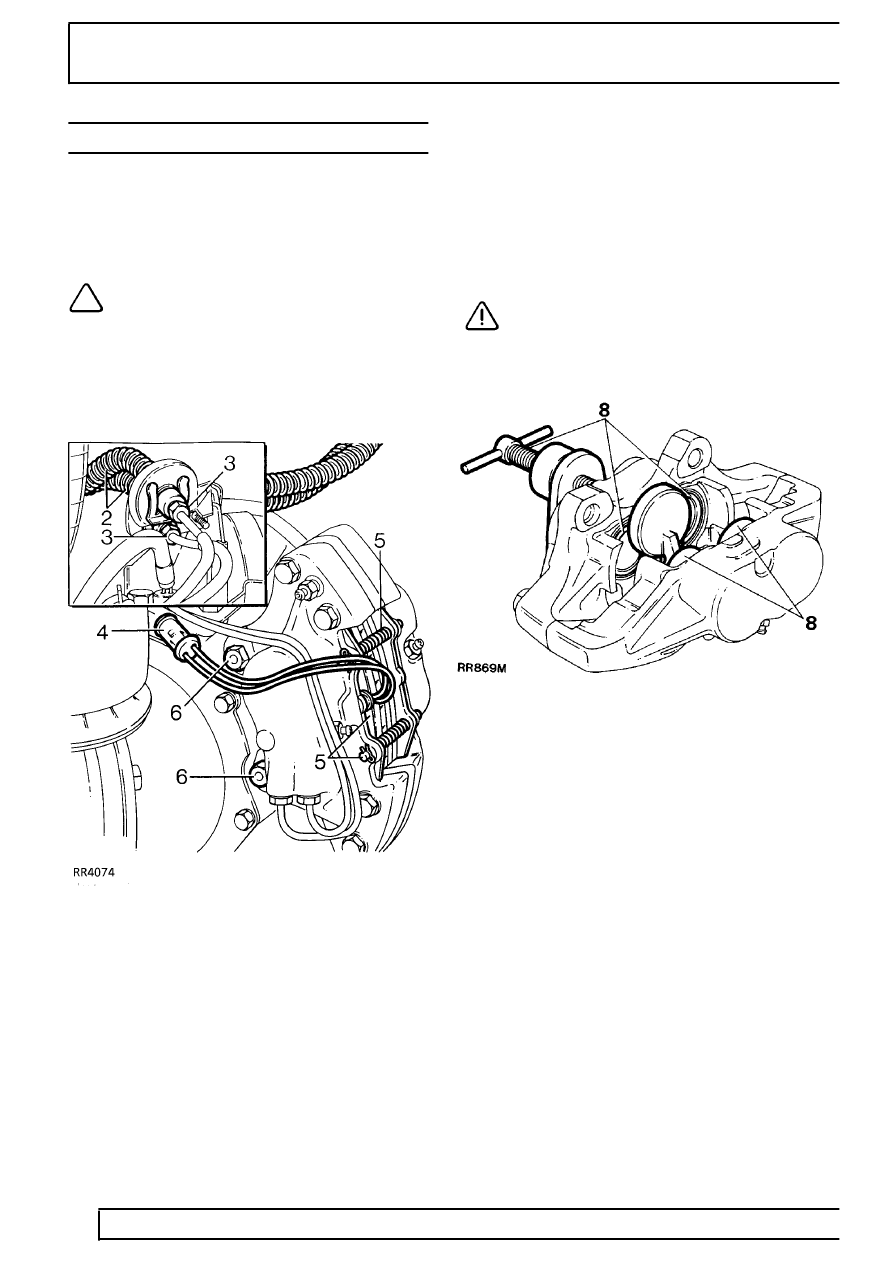
2. Expose flexible brake hoses by moving coiled
protective covering. Using a recognised hose
clamp, clamp both hoses to prevent loss of
brake fluid.
3. Disconnect rigid brake pipes from flexible hoses,
seal exposed ends to prevent ingress of dirt. (If
necessary rigid brake pipes to caliper can be
disconnected when caliper is removed).
4. Disconnect pad wear warning indicator (front RH
side only).
5. Remove split pins, retaining pins and springs,
withdraw pads. If refitting pads, identify them for
assembly to original locations.
6. Loosen bolts and remove caliper.
DISMANTLE AND REPAIR
CAUTION: Do not separate caliper halves.
Overhaul both calipers.
7. Clean outer surfaces of caliper using aerosol
brake cleaner.
8. Using special tool LRT-70-500, clamp pistons in
inboard half of caliper. Gently, keeping fingers
clear, and with CAUTION, apply air pressure to
fluid inlet port to expel pistons. It is unlikely that
pistons will expel at same time, regulate rate
with a suitable piece of wood between
appropriate piston and caliper.
9. Finally remove pistons, identifying them with
their respective bores.
10. Remove wiper seal retainer by inserting a blunt
screwdriver between retainer and seal. Pry
retainer carefully from mouth of bore.
11. Taking care not to damage seal grooves, extract
wiper seal and fluid seal.
12. Clean bores, pistons and seal grooves using
clean brake fluid only. If caliper or pistons are
corroded, or their condition is not perfect, new
parts must be fitted.
Parts & tools for this job Staging For Land Rover Range Rover
- PARTFront brake padsSearch: Land Rover Range Rover front brake pads
- TOOLCaliper piston rewind toolSearch: brake caliper piston rewind tool
- FLUIDBrake fluidSearch: brake fluid
Links open Amazon search results in a new tab. As an Amazon Associate I earn from qualifying purchases.