
OVERHAUL (page 6 of 14)
- Make
- Land Rover
- Model
- Range Rover Classic
41
TRANSFER GEARBOX
12
OVERHAUL
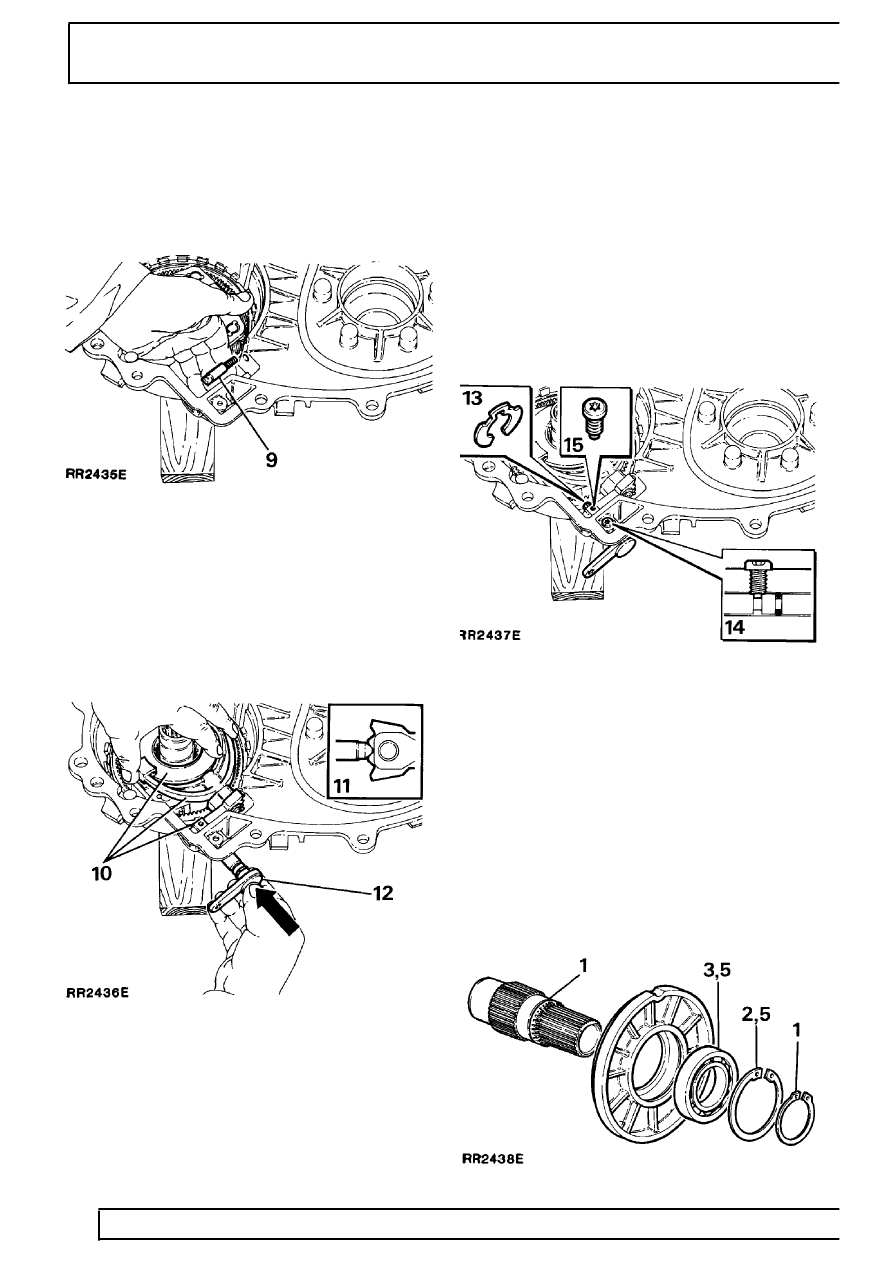
Selector fork - Assemble
7. Fit new nylon slippers to the fork.
8. Assemble the fork to the selector arm and
secure in position using a new retaining clip.
9. Lightly lubricate and fit the spring and selector
plunger.
10. While compressing the plunger and spring, fit the
selector fork, operating arm assembly and
selector sleeve simultaneously.
11. Select neutral gear position at the operating arm.
12. Fit a new ’O’ ring to the selector lever shaft.
Lubricate the ’O’ ring and fit the lever assembly
to the rear cover, noting that when fully
assembled the lever should lie parallel with the
joint face of the rear cover.
13. Fit a new retaining clip to secure the selector
fork operating arm to the selector lever shaft.
14. Remove any previous sealant from the Torx
screw. Align the selector lever shaft groove to
the retaining screw hole, apply a small amount of
Loctite 242 to the screw threads and using Torx
bit 25 fit and tighten the screw to the specified
torque. Ensure that the screw locates in the
groove of the shaft.
15. Clean any previous sealant from the Torx screw.
Apply a small amount of Loctite 242 to the
threads of the screw and fit to the selector fork
operating arm, tighten using Torx bit 25 to the
specified torque.
Bearing carrier
- Dismantle, inspection and assemble
1. Remove the circlip and drive or press the
transfer shaft from the bearing.
2. Remove the circlip retaining the bearing in the
carrier.
3. Drive or press the bearing from the carrier and
discard the bearing.
4. Clean and examine the carrier for cracks and
general condition. Renew as necessary.
5. Press or drive a new bearing into the carrier and
secure with the circlip.
Parts & tools for this job Staging For Land Rover Range Rover
- TOOLTorque wrenchSearch: 3/8 inch torque wrench
- TOOLSocket setSearch: socket set metric
- BOOKHaynes manualSearch: Haynes manual Land Rover Range Rover
Links open Amazon search results in a new tab. As an Amazon Associate I earn from qualifying purchases.